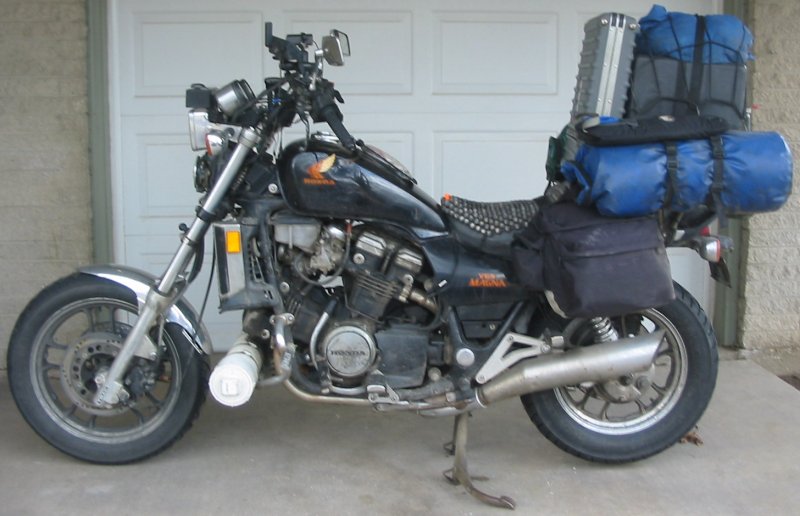
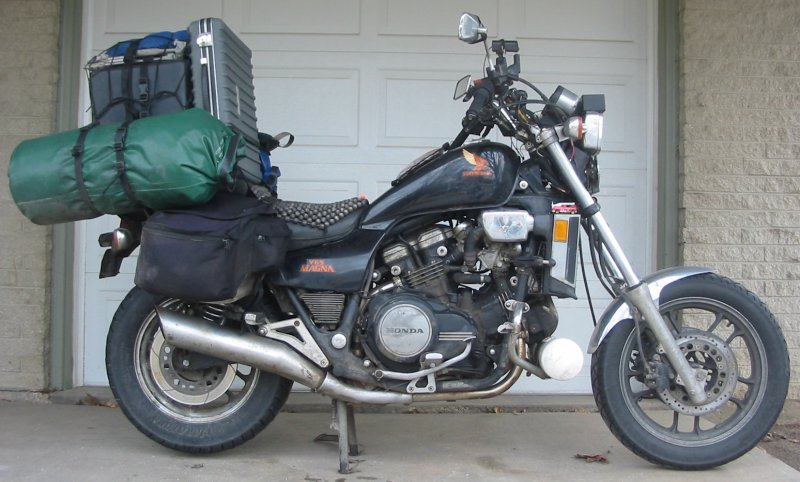
| This is a huge page. It has taken a few days and many hours to compile. Lots of pictures. Basically what I
did was to pull out the camera, take some pictures of the loaded bike,
and kept taking pictures as I unloaded / unpacked. There is no
"list" of the gear used as I think photos say more - quickly - than I
could via words though I did offer gear details as the pictures depict
items. Where reasonable, manufacturer/vendor
website links are listed. I do not offer links directly to the products
as those
link may likely change fairly soon. I do though offer PDF's of the
product web pages as they were as of this posting. They should be good,
long term reference items. You'd think that after four months of packing / unpacking / packing / unpacking I'd have it down to a science - not quite. One thing I do know is that I prefer an accomodation that is on the same level and close to the bike. Why? I have to make 3 to 6 trips to unload the bike then the same number of trips to load the bike. In trip reports from other motorcycle travelers this is a commonly appreciated item. As to having the packing routine down to a science - I'm close but some things are variables: dirty clothes often seemed to shift about as to where I packed them. Glove types and warm layers also seemed to shift a bit too - packed out of site in the warmer climates and packed ready for use in the transitional climates. All of the storage places were fairly set as to what they held except for the blue bag on top of the auxillary fuel cell. It would grow / shrink depending what was dirty (and thus stored in it) in addition to what cold weather items weren't needed and also stored in it. In the pictures below this blue bag is about at 40% "filled". At 100% filled it really sticks up and stretched the bungee net that snuged it down. There were primarily two environmental variables that I dressed for - temperature (hot, warm, cool, cold) and precipitation (dry, fog, rain/sleet/snow). The chart below reasonably details how I dressed for each condition:
* If there was rain/sleet/snow I made sure I had the rain jacket on (over the riding jacket), rain mits on (over the riding gloves), liner in the ridig pants, plastic bags over the socks before they go into the boots. See both notes below. ** Not true on this trip as I started out with Joe Rocket "Ballistic" pants which did not have a liner. In San Jose I picked up a set of First Gear "HT Overpants" and simply left their liner in - hot temps found me sweating - I dealth with it. The JR pants were a single layer pant - and they were not waterproof. For those I had to put on a rain layer under those pants (my rain layer would not fit OVER them - specifically they would not fit over the boots) The HT Overpants (with liner) do seem to be rather waterproof. So far I've not used rain pants under the HT Overpants w/ liner installed. *** The poly-pro "moisture wicking" socks can't work if they can't wick moisture further out from themselves. The moisture from my feet stays trapped in the riding boots, the socks get wet, loose their thermal ability and I end up with cold feet by the afternoon. If I bag my feet first this keeps internal moisture (from my feet) away from the socks and thus the socks stay dry and my feet stay warm. If it's raining I also use a bag outside of the socks. The outer bag keeps external moisture (rain) from getting to the socks from the outside. Might sound like a hassle but it's just part of the routine - plus, bags (plastic grocery style) are easy to obtain and pack small when not needed. Standard, loaded setup
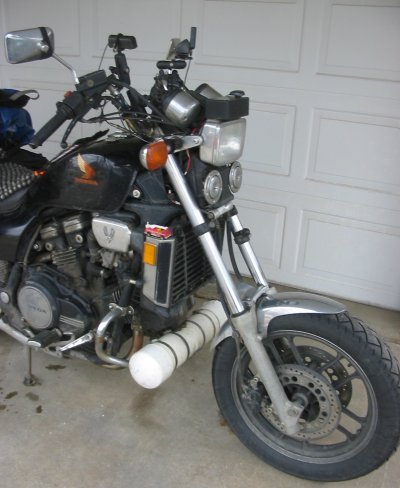
1984 Honda Magna "V-65" VF-1100c, ~46,000 miles at trip start Heavy, old(ish) bike;
1100cc V-4
motor, electronic
ignition (reasonably failure resistant), liquid cooled, shaft
drive (no chain maint - different from maint free),
has a center stand (practically a must-have item for road trips);
carburated (no potential fuel
injection system problems though it does have a fuel pump - but it
could
operate, should the fuel pump fail, via gravity feed from the aux fuel
cell).
Started with Bridgestone Spitfire tires but switched to Metzler 880's
in San Jose CA - a suggestion from Gil in Eureka - thanks! (I like the
Metzler tires better - anyone want to buy two sets of new Bridstone
Spitfires? Contact me).
Three seating
positions - feet hung over the highway pegs (some riding in this
position - torso is
pushed back and the arms are stretched a bit to get to the bars -
certainly a different way to take the twisties), feet
on the standard pegs (most of the miles were spent in this position - I
think I would like the handlebars to be pulled towards me perhaps 1/2
to
maybe 1 inch. They are as far back as the clutch and brake lines will
allow - any more I will need to install longer lines), heals hung up on
the passenger pegs
(comfortable lean forward into the breeze - many miles in this
position.). I don't ride standing up much at all - I'm comfortable
sitting for long hauls and the peg arrangement to stand is awkward -
it's almost easier to put one foot on the rear peg and the other foot
on the standard peg.
       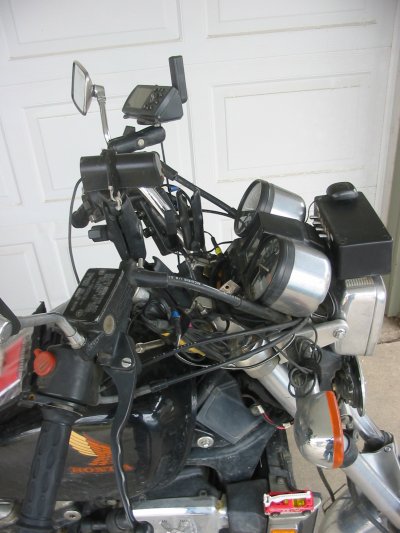  Dash setup - with full cameras (cameras pulled if it's raining) - pretty much as it is when I'm riding. Garmin GPS III Plus
(PDF: general,
spec's)
GPS sitting on the "map" screen showing where I'm
at, speed, time, altitude, miles
since last fuel
stop. It would be nice to have a slightly larger screen - specifically
near New York City where the screen gets FILLED with roads. Color would
perhaps help as well. Faster refresh rate when zooming in/out would be
nice. Most of the trip utilized the basemap roads though I did upload
some road maps via MapSource from the laptop. In the areas where I did
"routes" I found that simple waypoints were the best - not activating
the route as that would add another "black line" to the screen -
clouding what was a road and what wasn't. Having waypoint blocks
(waypoint text/name
turned off) visible made the process of "connect the dots" the norm for
following a route - I often created the route in DeLorme's Street Atlas
2005, uploaded it to the GPS, then downloaded it from the GPS into
MapSource - this would give me a basic waypoint and route setup. From
there I
would add a few waypoints - usually one slightly before each turn and
one slightly after each turn (and then re-upload back to the GPS for
use). More tracklog data points (~1800 exist in this model) would be
nice. The laptop software review will detail more of what happens at
the laptop end. Other screens of the GPS that get used - Trip Computer
screen (total miles), Stats screen (Voltage [when connected to bike
power it monitors bike system voltage], Lat/Lon [document where some
nice road /
picture is], Trip Odometer [how many miles on the fuel tank],
Sunrise/Sunset [When do I need to get up for the sunrise / how long
before I run out of daylight - get a campsite or get off the road],
time / date [What date is it today?]). One GPS item that is not so nice
- and I think it could be automatic - time zone updates. It's not
always listed (roadside sign) when you travel from one time zone to
another. The GPS does not automagically update or notify of a change -
would be nice. Also a GPS feature that would be appreciated - the map
cursor always stays in the center of the map screen. I would like it to
have an option to stay at the 1/3 secton of the screen. I don't care
much for the road/map listing for what is behind me and would like to
see more of what is in front of me.
Still camera, Canon PowerShot A-40 (PDF: spec's), with filter ring and 256MB Compact Flash card, waiting for me to reach up and snap a pic (pictures were transferred to the laptop via the CF card directly - no cables to the camera - a PC-Card to CF card adapter was left in the PC-Card slot in the laptop). Quite reasonably happy with this unit. Needed features - the ability to use external power (it does), the desire for the camera to remain (powered on all the time - just waiting to snap a picture). This camera does not quite have 100% ready state as a couple minutes from not using it the camera will perform a sleep function. From sleep it takes about 4 seconds to wake-up. At road speed this often causes some scene to be "gone" by the time the camera is ready. If I think there might be a scene coming up I will "touch a button" to wake the camera up. I know if it is asleep or awake - is the LDC screen on. I would also like to be able to "hit a button" and have the camera 100% take a picture. While I know issues exist with the trigger button on this camera I still would like the option of being able to hit a button that would ensure the camera would take a picture once it figured out the scene settings. This would allow more two-hands-on-the-handlebars operation of the bike. While I would like this I do know that having a hand on the camera provides for a clearer (less blurry) picture as the hand tends to remove some of the vibrations acting on the camera (most of the bad vibrations are from the roadway - less from the motor). The camcorder, Canon Optura 20 Mini-DV tape (PDF: features, general, spec's, in the box), view screen open to allow me to see what's going on as well as to hit the record/pause button in there (since I'm using an alternate video feed the normal record button isn't used and this camera does not use an external LAN-C remote control). A preferred camera would have LAN-C control and the ability to change tapes w/o removing the camera mount. The optimal recording method would be to have four or five video heads (facing different directions) that are in an always record mode (to something like a central computer hard drive perhaps) where they would record but the recording would loop / erase after so many moments. I'd then have a button to "Save" all loop recording and then permanent record all remaining video until the "Save" button was turned off - if this were the case all of the crazy drivers would have been recorded. The camcorder is also capable of taking 2 MP pictures onto an SD card. The laptop has a dedicated SD card reader spot. A 32 MB SD card was used. Tachometer, engine temp, gear selection, fuel warning and turn signal usually visible - speedo not visible. Camera head (HelmetCamera.com) (PDF: general) unit. Decent housing and cable connectors. I'm happy enough with the video quality. I think it's the 480 line camera - not sure tho. Devices held with RAM mounts. (PDF: camera mounts with handlebar u-bolt mounts) One thing I might change would be the ball size for the camcorder. All mounts utilize the 1" ball mount. The camcorder 'shifts' a bit on this ball size. A larger ball size would keep the camcorder more stationary. 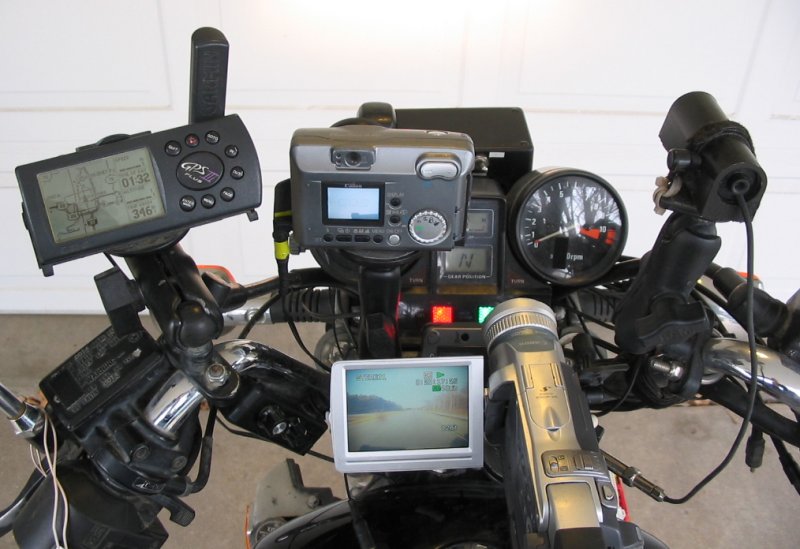 It looks like a mess
- that's certain. I'm 90% a "function-over-form"
guy so it doesn't concern me much. The images the setup produces will
be
appreciated over and over - specifically when I can't get out any more
in my life to enjoy the scenery directly.
 Wthout the camcorder
the dash opens up a bit - the radio (XM satellite Roady2 radio PDF:
radio, quick guide, operations manual)
is easier to
get at. I could see possibly relocating the radio up and left - maybe
below-left of the GPS but since the radio is a lower priority item I
probably won't.
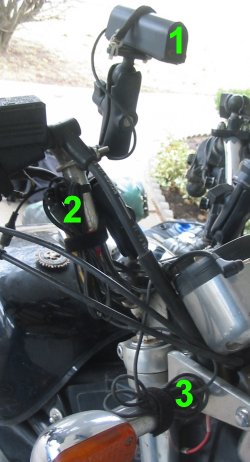
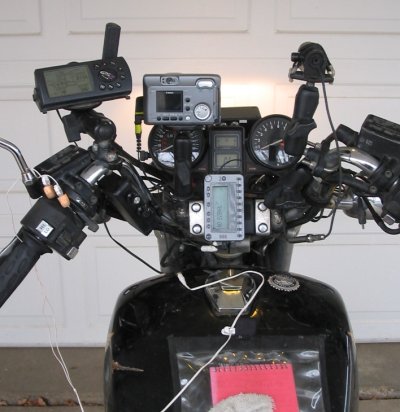 1) External volume
control for the
XM Roady2 radio. The radio has an
internal volume setting - I set this to about what I want and do the
routine adjustment with the external, in-line volume control (Radio
Shack
- I am unable to find this product on their website). With the Etymotic ER-6i
headphones (PDF: general,
spec's, comparison)
(using the foam earpieces - the rubber earpieces do not isolate
external noise as well and they hurt my ears after a few hours) there
is little volume change from when I am
at a stand-still to when I'm moving at 70 mph - they have good external
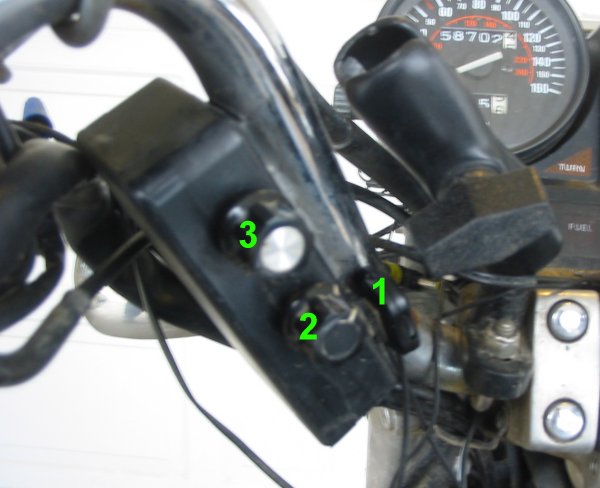
sound isolation. 2)
Heated jacket temp control (Heat-Troller)(clockwise
for more warmth), 3) Heated
gloves temp control. Below each temp control knob is an "power on"
status LED
- I like having them hidden from my normal riding eyesight - I
think, at night, the blinking lights would be distracting
(specifically in the rain with rain drops in the
face shield).
 Still camea with protective UV filter and accessory ring installed. 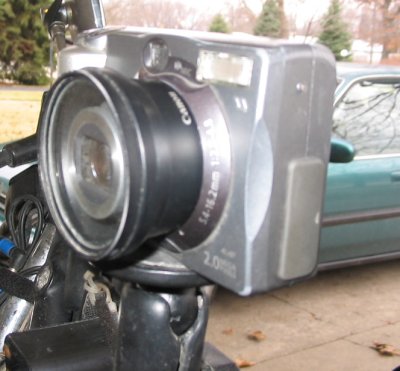 UV filter and accessory ring removed. 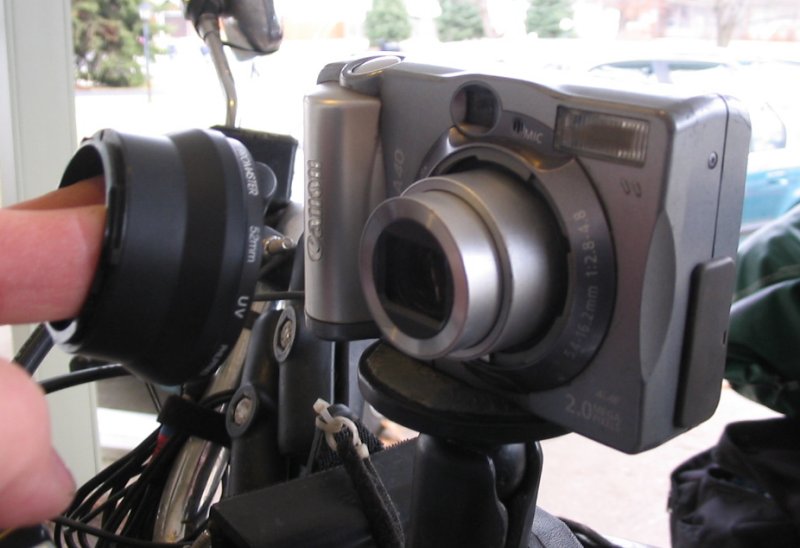  Power converter box
Switches - from left to right: Still camera (4.5v), Video camera (8.4-9v), Video head (12v), Radio (6v). All switches are turned off. The major components for the DC-DC power conversion are 1500ma "cigarette lighter" DC-DC power converters. I removed them from their original housings and placed them into this box for a more compact, easy to work with, package.  The "dash" contains
the adjustment tool for the Vista Cruise throttle
lock and a double ended pencil. Both held in place by Velcro.
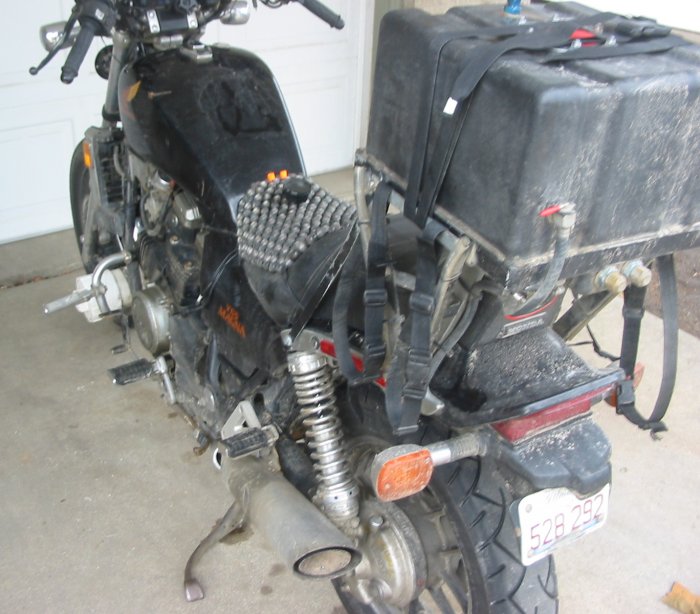
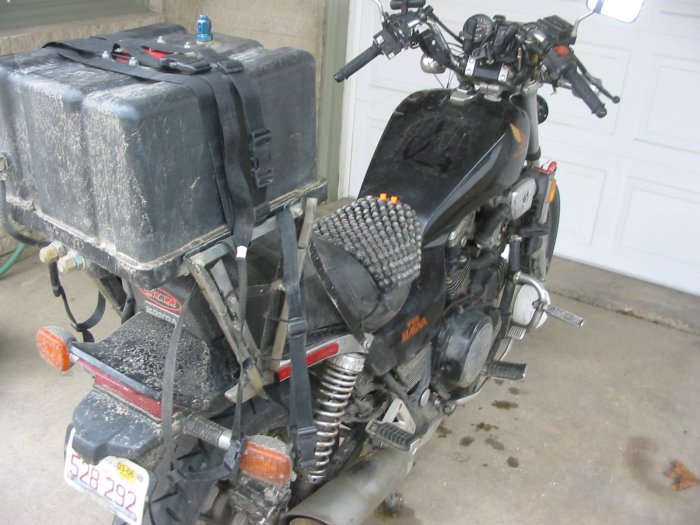
The pencil is often handy at fuel stops for writing odometer numbers on the fuel receipt. Unlike many pens it doesn't mind wet or freezing weather - it's also shorter than a standard pen. The Vista Cruise throttle lock is a step up from a palm rest (Throttle Rocker) which is a step up from a plain throttle handle. It _would_ be nice to have a true cruise control (less fatigue, less checking the speedo / more attention to the road and area around me). The Vista Cruise is not a full throttle lock - when "locked" the throttle can still be rotated by hand and also the carb return springs would slowly force the throttle to close down. It certainly does give enough time to relaxe the right hand, tend to a shortish (5 to 20 second) task that required the right (or both hands). In flat areas, leaving it on, helps to reduce fatigue in the right hand. After (or in) a rain it seemed to 'hold' better than after a few days of dry operation. Perhaps the water washes dust and dirt out of the area allowing a better mating surface.  Hard case held in
place by an
elastic rubber strap. I started with one of the
black "pull tight" non-elastic straps that all of the other luggage
pieces use but
it would not hold well (would slowly relax over the bumpy miles and the
hard case would hit me in the back). I switched to a rubber strap and
it works much better - staying firm against the fuel cell. The elastic
strap - where it crosses the front of the hard case - is a handy place
to stick some temporary items - rain mits or nicely the neck gaiter
(making for a softer pad to lean back on).
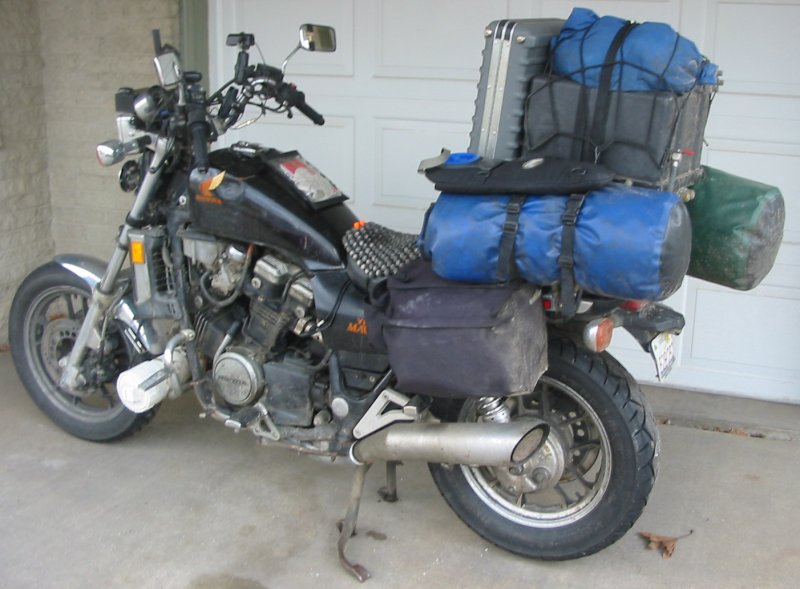
The hard case holds most of the valuable items. Trip photos (originals as well as those edited for the website), GPS tracklog data, movie tapes, passport. This case was the most protected item - along with the items from the handlebars. If I left the bike it often went with me. There were also times where carrying the case wasn't a desireable option - but I would be away from the bike. There I had to make a decision. One of the places where I left it unattended was at Cape Flattery. A small parking lot in an out of the way place. I had a 20 minute walk to the water, time at the water, and then the walk back. For those spots the case did stay on the bike and I hoped all would be well at the return (always was on this trip). I always tried to separate important items. Passport in the hard case, drivers license in the wallet which was in the jacket. Cash in the wallet, pants pocket, hidden on the bike. Two credit cards - wallet and pants pocket. Keys - in the ignition or in the jacket key pocket, key in the wallet, key in the luggage (you might recall that I started with two keys - one slipped through the decking cracks at the hostel in Fairbanks and the other disappeared in Seattle. After that I had to take the front end apart to get to the ignition - taking that to a locksmith to get new keys made. Due getting burned by not making a spare key when I had a chance (somewhere between Fairbanks and Seattle) I learned from that lesson when I used the original bottle of tire Slime - I made sure I quickly replaced the used bottle with a new one]. A couple times I wanted to get something out of the case at a public spot (change a tape in the camcoder) - I would time that for when I was leaving an area. Instead of opening the case (for others to see what was in it), getting what I wanted, closing it, strapping it down, leaving things unattended for minutes or hours I'd do the opening/getting after I came back to the bike. At that I'd be leaving an area an any person watching probably wouldn't be around at the next unattened place. As for the "safety" of the non-lockable luggage - in not being tampered with - I attribute that mainly to good people in the areas I traveled - and partially to the "don't mess with the bad biker" stereotypes.  Hard case removed.
The nook under the fuel cell that would be behind
the hard case is just right for a gallon jug of anti-freeze.
I carried a pre-mix gallon from Whitehorse, YT up around Alaska and down to Seattle as I kept topping off the cooling system due to the occasional leak from water pump. It might be possible - with routine packing - for me to relocate the blue bag from above the aux fuel cell to down here.  How the Camelbak StoAway
2.1 Liter (PDF: general)
water pouch affixes to the bike. Two of the three left side bungee net
hooks slip through the camelback rings. When the Camelback is empty the
road wind does kick it up and make it bounce about but it doesn't leave
the bike. The "supply hose" has this somewhat insulating material over
the plastic hose - it "sticks" to the hook fastener material on the map
pouch - a handy spot to place it so it's where I want it. Ari, who I
met in St. Augustine, Florida, I think mentioned he has a magnet on the
hose such that he can "stick" it to anything metal that is handy.
 Hooks w/o the
Camelbak. The three left side hooks are visible. The
corner hooks clip into a hold at the corner of the aux fuel cell
mounting frame. The middle hook can either hook under one of the
straps or under the unpainted bar at the side of the aux fuel cell.
Hooking onto a strap is a more complete catch than the metal bar but
when I've hooked it to the bar it was always hooked when I returned to
it miles later.
 Blue bag with the
bungee net removed. The primary strap that holds the blue bag onto the
fuel cell. The strap
does not go all the way around the blue bag and under the fuel cell. It
goes over the blue bag, down the side to the unpainted bar, under the
bar and back up to the top of the fuel cell. Sound confusing? Look in
future pix...
 Right side - showing the blue bag
strap and the tripod strap
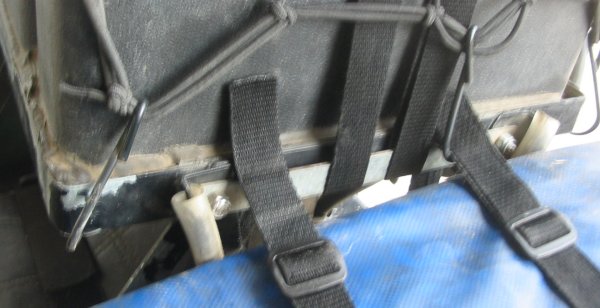
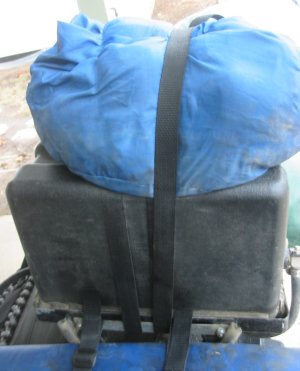
(the tripod strap DOES go all the way around/under the fuel cell). Note the difference between the straps. The blue bag strap uses only a buckle. The tripod strap also has fastening rings a few inches away from the buckle. These rings keep the strap from "adjusting / slipping" and getting slack. All of the straps utilize these rings except for the blue bag. Since the blue bag changes in volume the strap needs to easily change in length. No item is held down with only one strap. The tent and sleeping bags have two straps. The blue bag and tripod, while primarily held with only one strap, have a bungee net that goes over both of them.  Blue bag removed.
Tripod still strapped down. You can see how the blue
bag strap snakes under the unpainted bar (and is now laying / hanging
on the green bag).
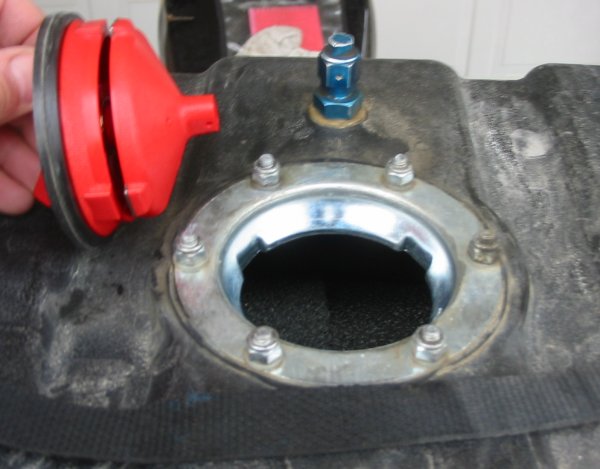
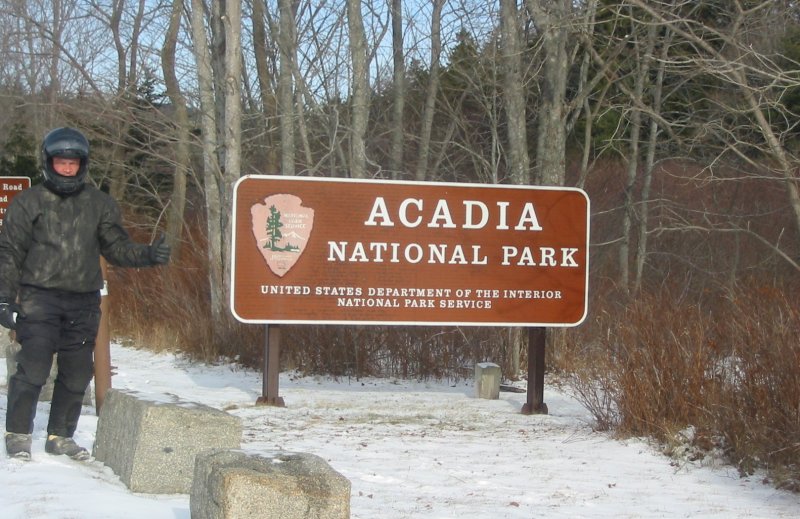
The tripod - I wanted to have something around for holding a camera for those times when I'm not there to hold a camera. I think I only used it twice (Olympia National - Hurricane Ridge video; Key West - sunset video). It was one item that was bulky, a slight nuisance, didn't get used near as much as I thought it might. Next time I could see leaving it home. At Denver I added the RAM ball as both cameras already have ball mounts to them (holds them onto the handlebars) and this would allow quick and easy use. Turns out that the rubber ball system, tied with this inexpensive tripod (I didn't want to take a nice one) allows for too much movement in the camera. Thus I ended up taking the ball off. I tried - didn't work well. Having the cameas mounted to the handlebars I would often simply point the bike in the general direction and use the bike as the tripod. The picture of me standing by the Acadia National Park sign was taken this way.  To fill the aux fuel cell I had to remove the blue bag and pull the straps out of the way. 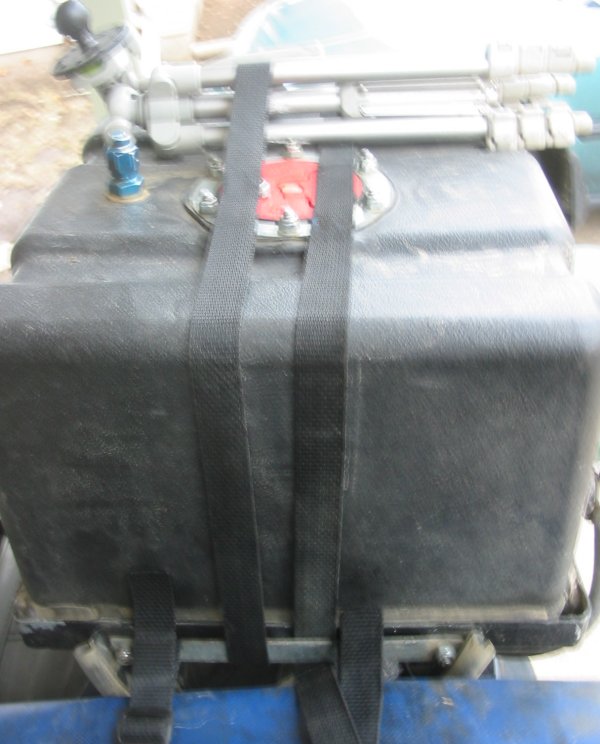 JAZ fuel cell (JAZ
"Drag race - horizontal", 5 gallon, 547-250-005-01)
from Jegs.com
(PDF: general).
I think they can be purchased without fuel fittings - vent and outlet.
That being the case I'd rather do it that way as I didn't use their
fuel outlets and didn't care for the nipple at the vent fitting.
Top valve releases approx 3.5 gallons into the bike's fuel system. I can easily open this valve as I ride. The lower valve has to be opened by getting off of the bike (I'd like to change that). Fuel valves often used in ultralight vehicles (PDF: valve, rubber bushing). Drill a 7/16" hole, insert the bushing, push in the fuel valve - done. 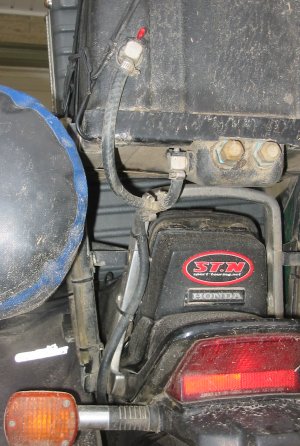 1) Upper valve (open position) ; 2) Lower valve (closed position) 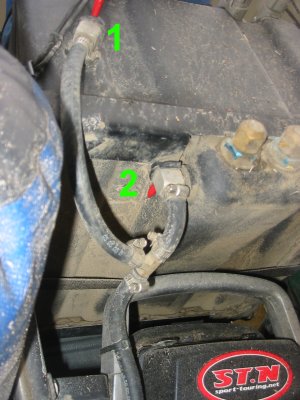 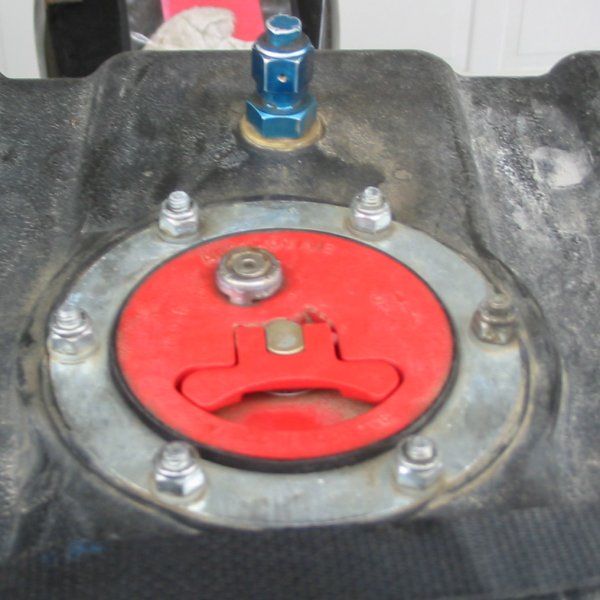 Aux fuel cell ready
to fill. You can just make out the anti-slosh foam
in the tank. The blue fitting is an air vent. Note the small hole on
the back side that is facing us. That small hole (1/8" perrhaps) is
drilled at an UP angle to keep rain from dripping into the fuel cell.
When the bike would tip over some fuel would drip from this vent. Not
much, perhaps 20 drops before the bike was rited or a vacuum
would
be created.
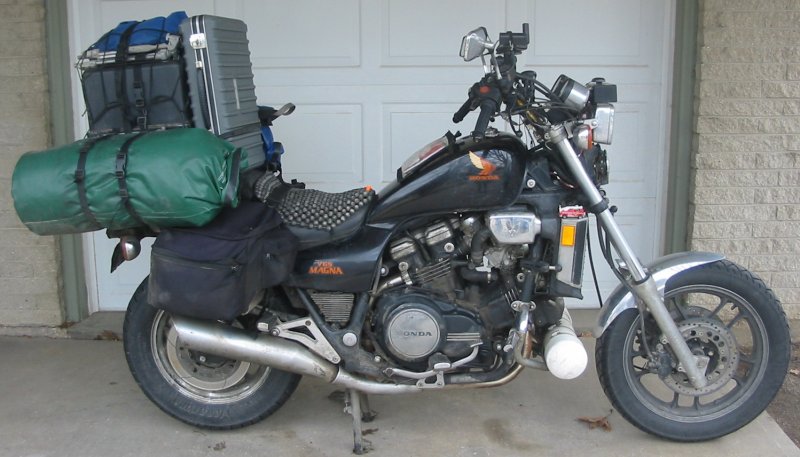
 Using the saddle bag
handle (highlighted with the green line) I would
loop the clasp of each of the dry bags to the saddle bags. Without
doing this the dry bags would rotate or "fly" back by the wind
- wrapping around
to the back of the bike covering the turn signals (let alone making me
wonder if the two straps to secure them would hold (they always did)).
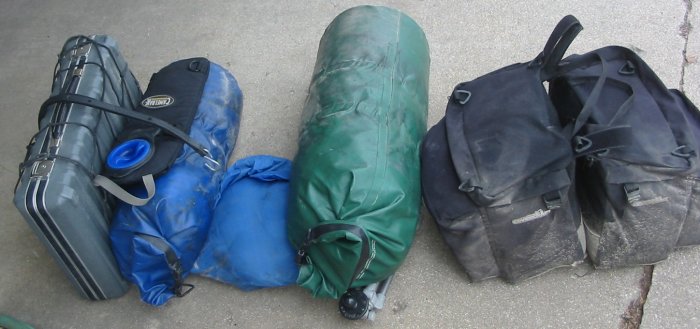
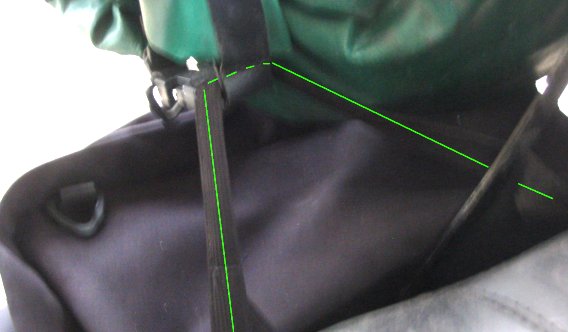 Two side straps - left side for the blue tent dry bag. 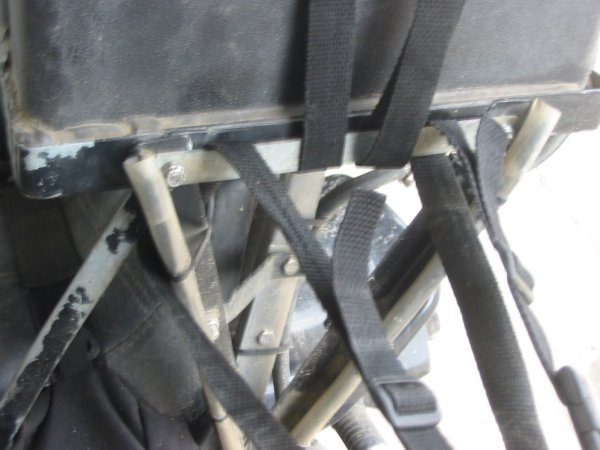 Both dry bags
(Purchased from REI
- PDF: bags) removed
- now for the saddle bags. Covercraft saddle bags from JC Whitney (close
to home - picked them up) - PDF: saddlebags,
tank
bag (not used) but the map pocket was
 In the past (w/o the
fuel cell) I'd simply lift the saddle bags off but
since the rear strap gets threaded through the framework for the aux
fuel cell I now have to un-thread it: Pull at the Velcro to start the
release, unthread, lift - done. It was this strap - where the loops
attach to the bags themselves - that I thought would fail (pull out)
with
the weight and bumps - it's still well fastened with no signs of
ripping or tearing - great!
 Depending upon how
much I juggle (in addition to the helmet, GPS,
cameras / radio) we have a few trips to shuffle into the room / tent.
   The right saddle bag,
no matter how much attention I give it to ensure
the LEFT bag is heavier, seems to ride low and then contact the brake
calipur. Note the shiney parts where the saddle bag has worn the
coating of paint off (saddle bag pictures - further down -
show
the saddle bag wear).
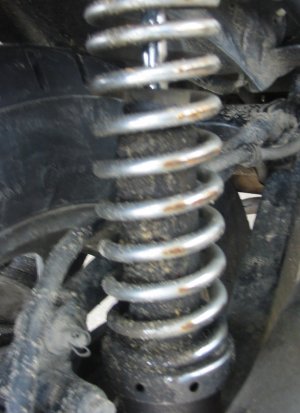
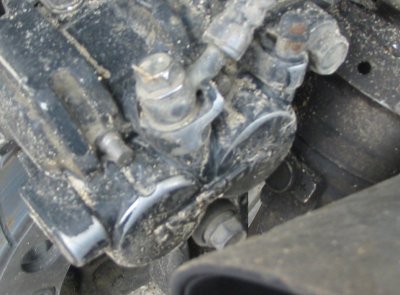 Recall back in the
Yukon Territory that I didn't want to slow down on
the roads and I broke a few welds? Recall that one of the welds was the
top mount for the right rear shock? Note the shock - coated in
oil. It's busted. Not that I noticed any handling
difference.
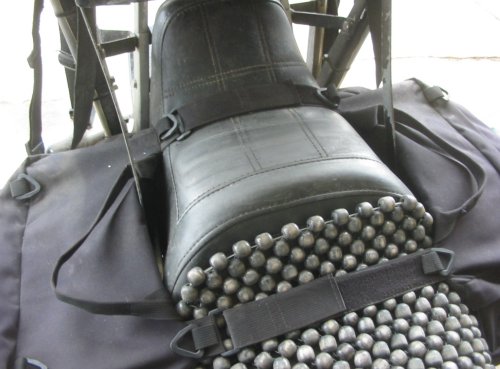
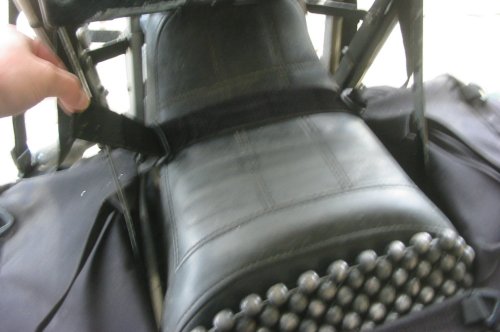
 Ahhhhh - the beaded seat cover! Purchased from Sampson Sport
Touring but it ultimately came from Bead Rider.
One big improvement in the Monkey Butt arena. For those not familiar with the MB issue it's where your rear end, after sitting on a motorcycle seat long enough gets extremely sore. Sore enough that it's hard to get OFF of the bike - and that after a 20 minute break it still does not want to get back ON to the bike. It's primarily, for me at least, caused by two factors - moisture & cotton. Wearing cotton briefs on a warm day. Bad combination. The beads are not there for a "massage effect" - they are there to get airflow under the body to keep the body dry. This alone is good enough that I could wear cotton next to the skin - but I still prefer running shorts. On cold days you can feel the cold air passing under your rear (I thought about "stowing" the beads in the cold temps but it's not that cold). For this reason some folks prefer the sheapskin covers as they are supposed to keep you dry and cool in the hot temps and warm in the cool temps (plus it doesn't have hard beads to scratch paint (pix below)). One plus to the beads over a sheapskin is that the orange earplugs have a place to sit when I'm off of the bike (they usually stash into the jackets key pocket but this pocket is not accessible when the rain jacket is on). 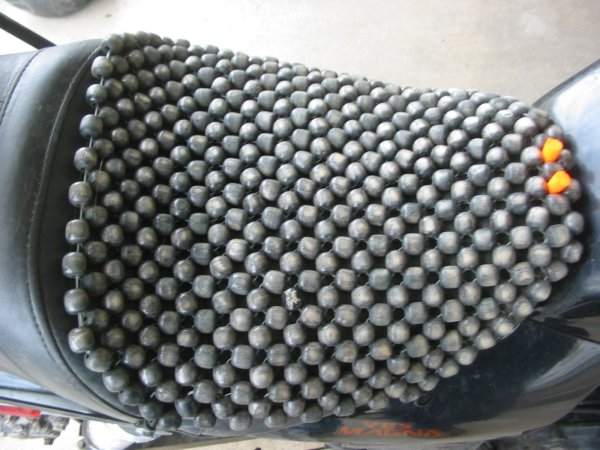 Some paint scratches 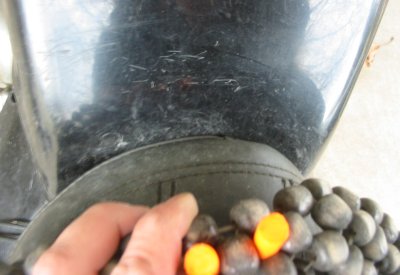 The FireChick truck - still hanging on! 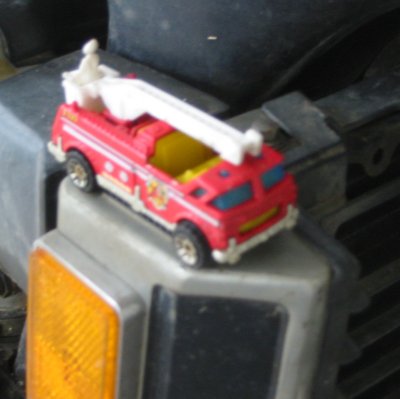 Ahem, well, the bike did get 'marked' on the rocky road - dent in the right front exhaust pipe. See the Addendum page for the crazy rock road I tried to ride 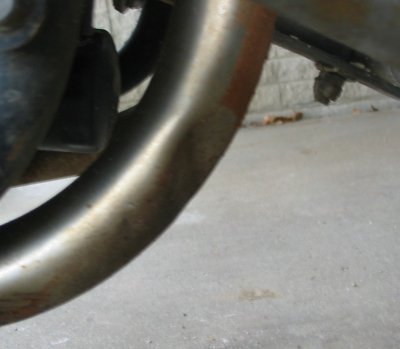 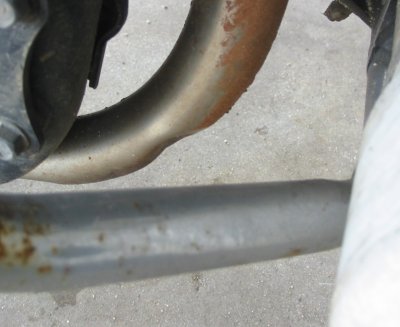 Power leads for the
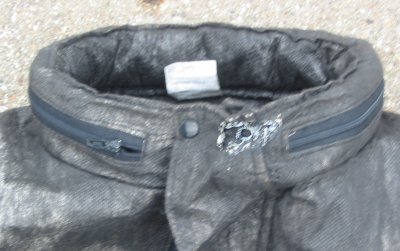
jacket and gloves (black jacket - white gloves).
Interchangeable really it's just that the white cord is controlled by
the top knob (on the dash) and the black by the bottom knob.
For some reason the chip in the top left of the side cover happened on this trip. I don't know why it chipped but I didn't catch the piece before it became road fodder. 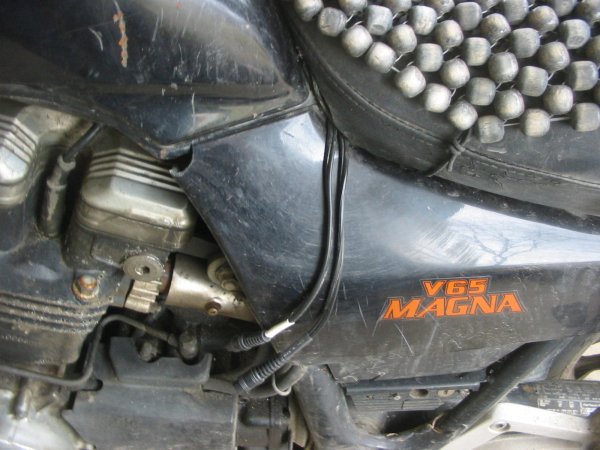 With the riding boots
having steel tips I occasinally hit / scratch the tank as I
kick a foot over. Once, and I don't remember doing it, I hit it hard
enough to scratch and dent the tank - DOH!
Not having the luggage on the bike I swing my foot around the
rear - but with the luggage I have to lift it across at the seat.
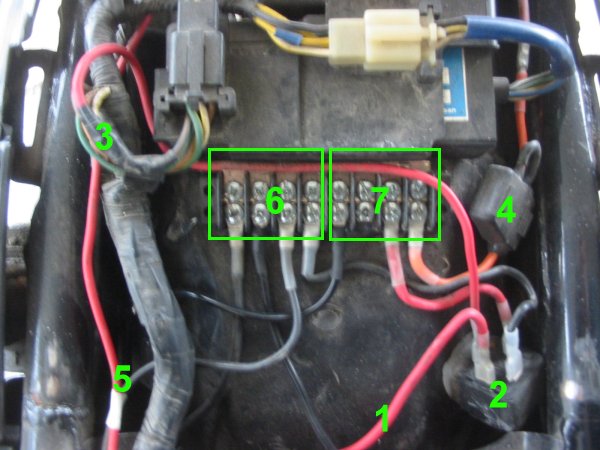
 Bike trinkets The firetruck, as you may know is from FireChick. The Pikes Peak item is from Keeennn during our 2003 Colorado Trip. 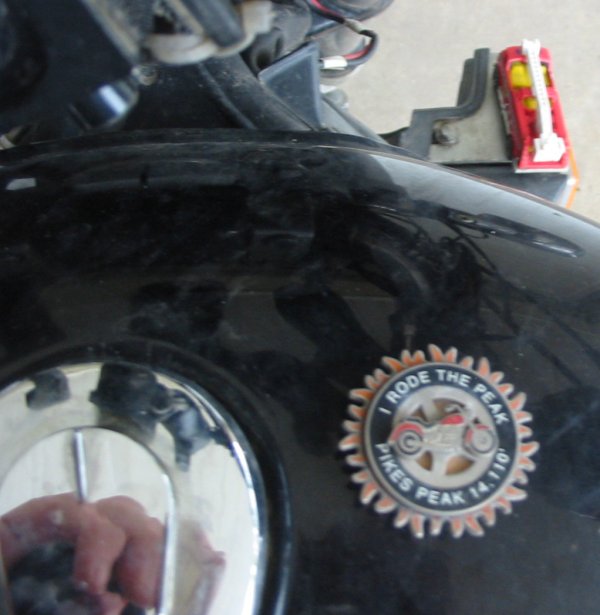 Accessory wiring. 1) Heat-Troller (PDF: dual, perm mount, coax); 2) Fuel filter; 3) Power distribution (fused, switched) 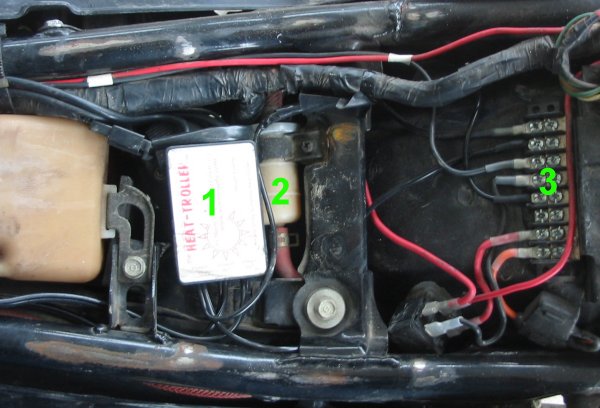 (1) 30A fused power
from the battery positive feeds into a (2) relay.
The relay is activated when the tail light is on (3) [I want to
re-think this as it's bad to have some possible loads running when the
bike is at the roadside with only the taillight on - when I left the
tail light on in the parking garage and ran the battery down it could
have been worse if the power box items were running and in addition to
this there are times when I want the items (cameras) powered when the
bike is off]. (4) Smaller fuse heading to wiring (5) that goes up front
to the power converter box. (6) - negative connections. (7) positive
connections. All connections are crimped (mechanical connection),
soldered (electrical connection) and then covered with clear heat
shrink insulation.
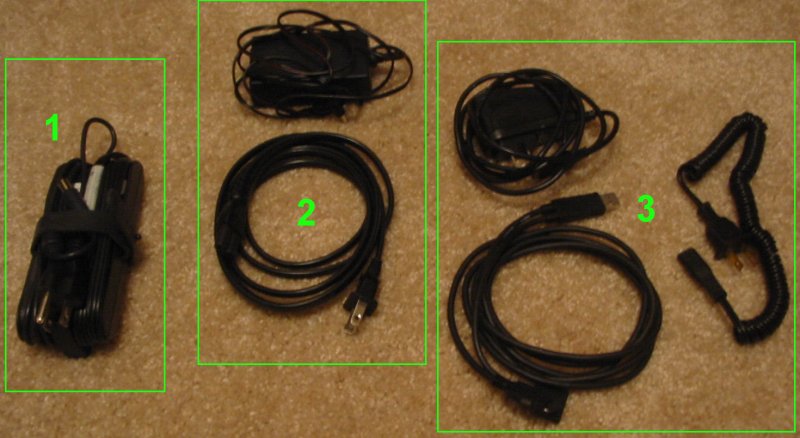
 Power converter box - easily removed from the bike. Unthread the wiring and unplug one supply power connection. 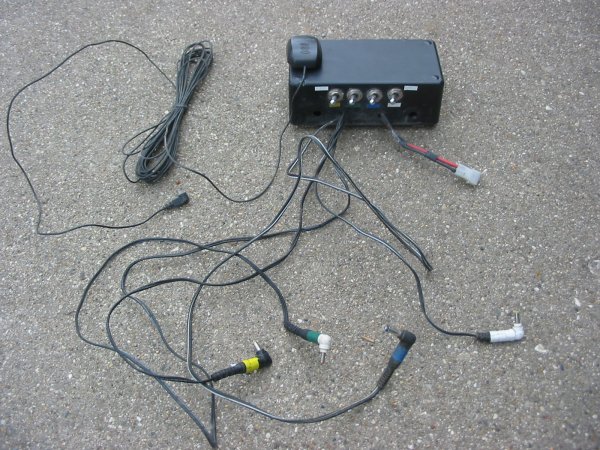 XM antenna (note the wear into the RatShak project box where the antenna lead ate into the corner of the box) 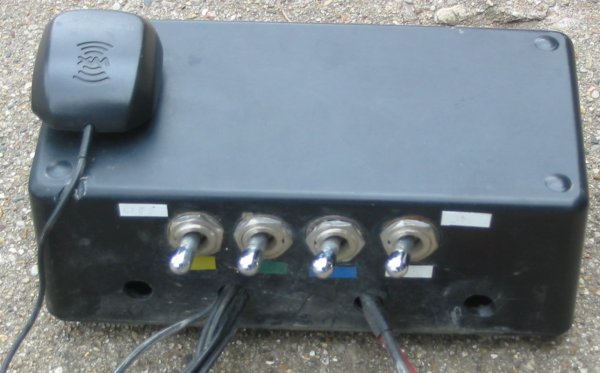 Air intake holes - to keep the DC-DC converters cool. Air comes in at the front of the box at the bottom and exits the box at the rear. 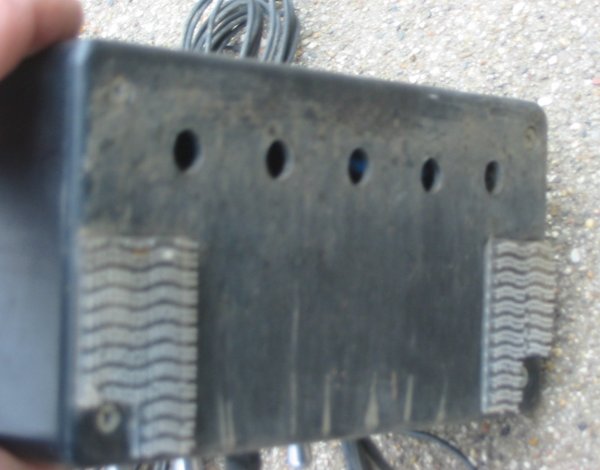 Mouting pads - box removed. "Industrial strengh" unisex fasteners (Radio Shack SuperLock fasteners - PDF). Available in clear and black. 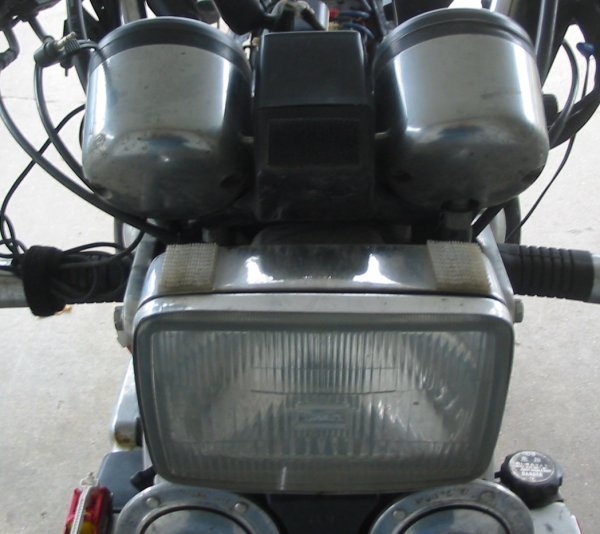 Switched, fused 12V DC power lead 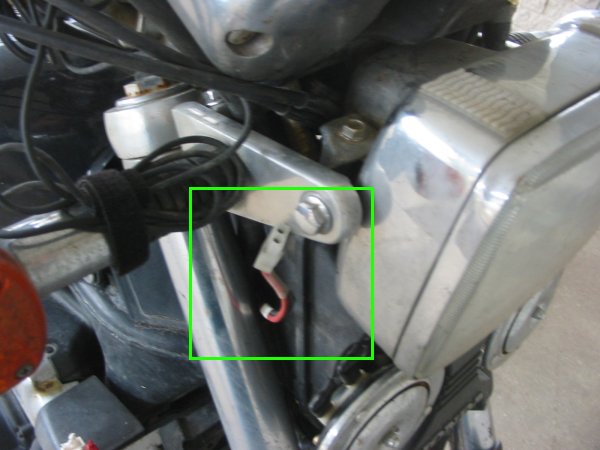 1) Camera head and
cords (2 & 3). The #2 cords are set - unchanged
during the trip - long cords that I did not shorted to a custom size.
The cord at the #3 spot would get un-wound depending where the
camera head was placed (on top of the helmet, down by my right foot,
out front on the forks, or here on the handlebars).
 A bare handlebar set
(though the RAM ball mounts are still on the bars,
the temp controller is still there, and the RAM ball and arm is there
for the GPS). Pulling the items takes all of two minutes.
 RAM mount - with extension arm - down by my right foot. 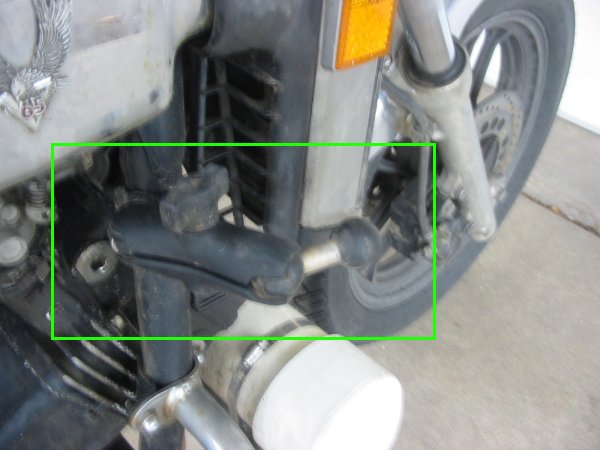 Extension arm removed.  RAM mount on the forks 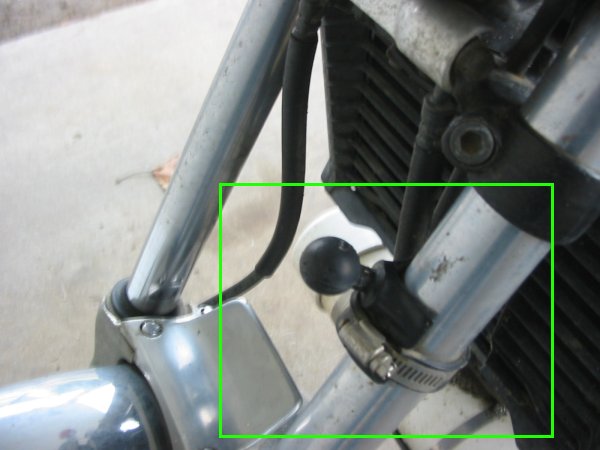 Stuff removed from the handlebars 1) RAM arms, 2) Camera head, 3) Still camera protective/UV cover, 4) Power converter box, 5) XM Roady2 radio antenna. (click for a larger size) 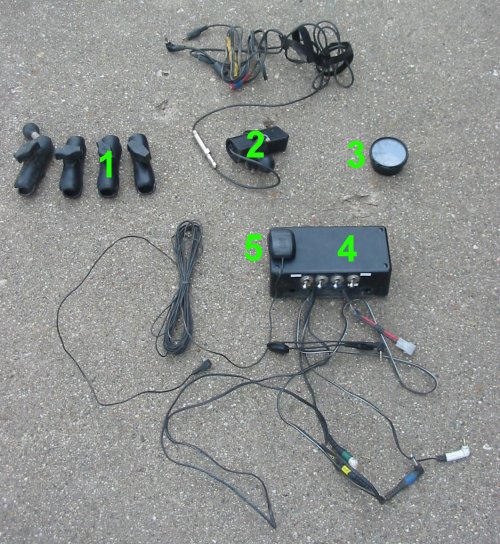 Blue (tent and ground plastic) & Green (sleeping bag & thermarest pad) dry bags, Camelbak water pouch, map pouch (Velcro converted to magnetic) 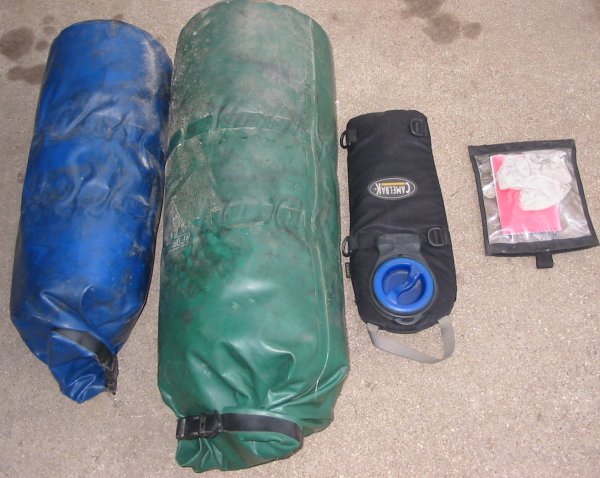 Sleeping bag and
Therm-A-Rest air pad. These "dry bags" are not "dry enough". I
did
have a couple times where the items inside did get wet. I think it was
due to blown rain slowly working in through the folded top. With the
dry bag folds facing forward (I did have them facing rearward a few
times)
I think they stayed dryer. I thought about placing a bag over the
folded top but in the end I did not need to. If I were going through a
very wet area I might consider it.
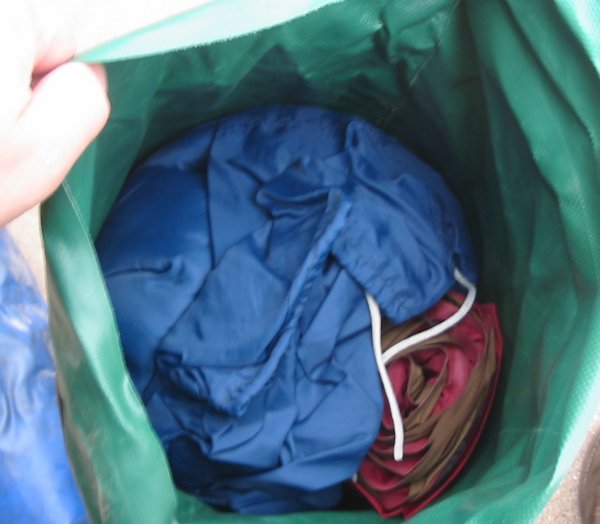 REI "TAJ 3" (PDF) three person tent and thick plastic ground cloth. 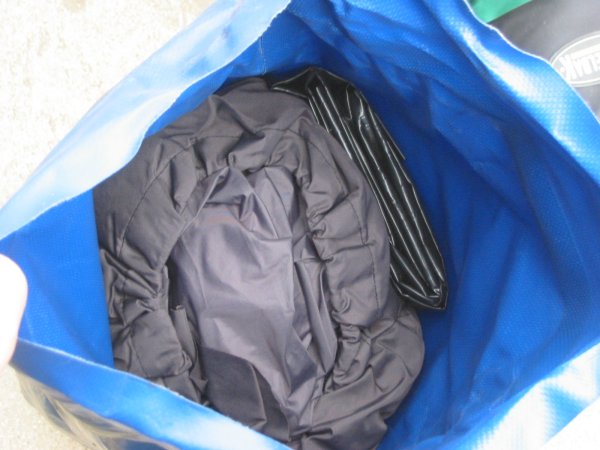 Velcro map pocket
modified with hard drive magnets (the two bottom ones were from a 4.3GB
Micropolis SCSI hard drive - the unit cost $1050
when I purchased it - drive long dead I'm at least still getting some
use from the magnets).
1) Map pouch (not used for maps but for things I might need semi-quickly; 2) Soft-ish cloth for wiping the helmet visor and camera faces ([used in conjunction with the water bottle listed below]; 3) one of the two padlock keys [for hostel lockers] - the other key is in my pants pocket; 4) Scientifically crafted starter relay jumper device (I made THREE payments of ONLY $19.95 for this handy-dandy timesaver) - used it one day around Bar Harbor Maine when the starter button was frozen - remove the right side cover from the bike to expose the starter relay - a quick jump of the relay - cha-ching; 5) A notebook that didn't get used near enough (but came in handy a few times); 6) Air pressure gauge that had similar use as the notebook (I'm a bad operator); 7) Leftover coins from the toll roads. I found that, for the toll roads, it was easiest to take a $20 and place it, unfolded, into the map pouch. At each toll I'd hold the pouch up to the toll taker and instruct them on how to pull the two tabs to open the pouch and for them to pull out a bill. They would - and then to dump all change back into the pouch. I'd then clamp seal it shut and place it back onto the tank. Much faster than me stopping before each tollboth, removing gloves, extracting the needed toll, going to the toll both with either exact change or a bill and getting change, leaving the toll booth and heading to the side of the road where I'd take care of the change and then put the gloves back on. On the ride from Boston to Bar Harbor two toll booth operators simply gave me the green light - "If you're crazy enough to be out here on a bike - you go free" - THANKS!  The headache solver
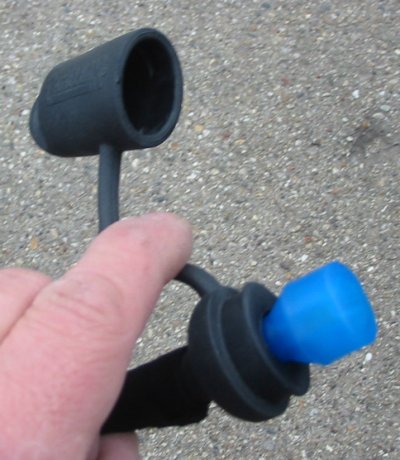
(aka the device for keeping dehydration in check). Camelbak StowAway 2 Liter unit with bite-valve garage (the rubber cover for the bite-valve). Crossing the plains of Canada it was hot - 90 F - and I was doing a decent job of sweating. Heading west into the sun I had a couple days where, by the afternoon, I had a splitting headache - one that would not go away with asprin and caffine. Hmmm - maybe I'm not drinking enough water??? Sure enough. Several riders use some sort of hydration system - home made or commercial Camelbak's. I picked this unit up in Seattle figuring I might need it when I pass through the warm south (it wasn't that warm when I finally got there though). 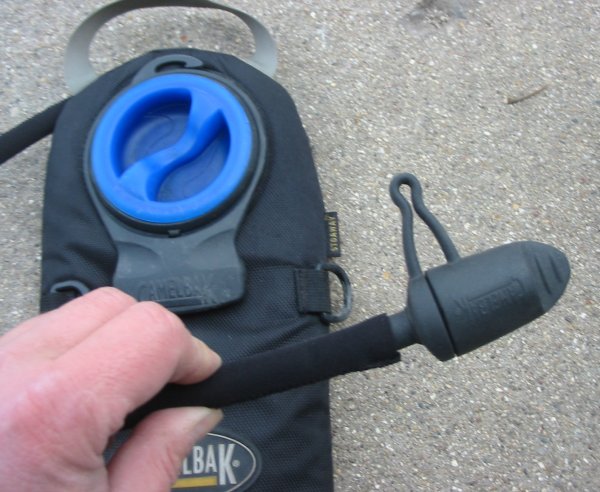 Bite valve. I could
see removing this straight valve and getting a 90
degree style. With my helmet - full face - I have to open the shield
and put the hose to my mouth via the face shield. A 90 degree bend
would allow me to keep the shield closed and run the hose up from below
to my chin. I could also see a flip-up helmet for a next helmet (might
be a while before I rotate out of the current helmet though).
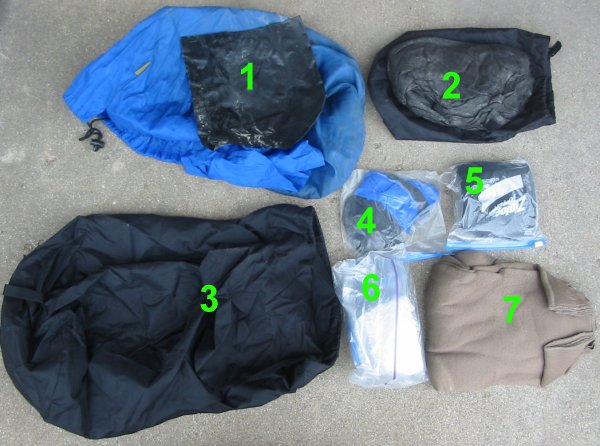
 Tripod with RAM ball mount. Not used as much as I thought I would. A bit of a hassle on the bike as well. 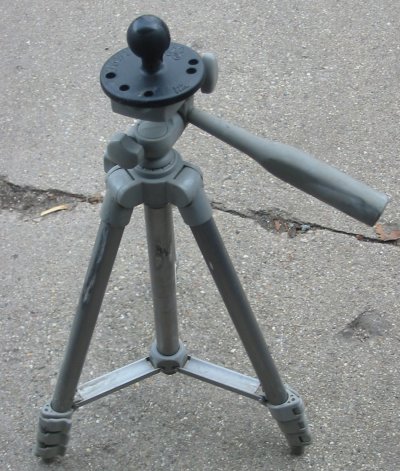 Contents of the blue
bag (since the final drive issue a few days before
trip end): 1) Blue bag with folded up plastic "base" to keep the nuts
from the top of the fuel cell from poking/abrading through; 2) Black
ditty bag with the rain suit bottoms; 3) Large black ditty bag for
dirty clothes; 4) Two small ditty bags - unused (I think the rain suit
was in them); 5) Two types of fabric - purchased back in Denver - to
make a skirt for the helmet to reduce cold air (not used); 6) Airbox
covers and old t-stat assembly (purchased in CT); 7) Long john
top/sweat shirt (the
most important item in the bag and was on top ready for use).
 Riding gear set - cold weather.  Boots AlpineStars Tech 8's (PDF) Decent
- good protection. I
find them comfortable enough for extended walking. The replaceable
steel toes on the boots are wearing out. I believe from walking. I'll
replace them shortly.
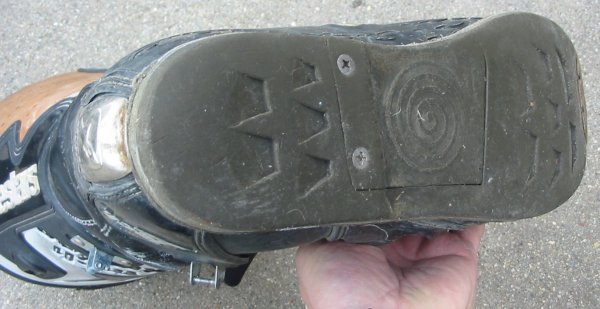
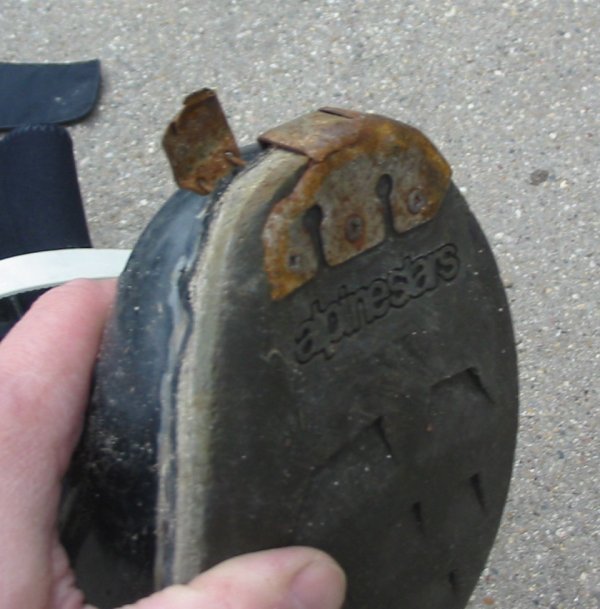 Soles are in good
shape (note the center piece - replaceable). They are intended for
motocross bike use - those bikes have steel
foot pegs that rough up a boot sole - something my bike does
not
have so the soles stay in decent shape.
 An effort at
waterproofing. The lower strap and the seam along the sole
- filled in with some Goop glue (it helped but it's not perfect - I
still do get some water in).
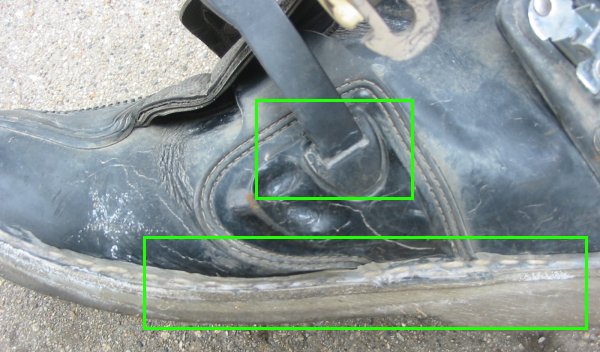 Glue covered seam on the left - standard seam on the right. 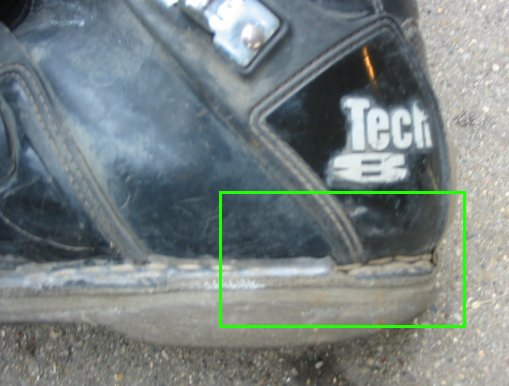 Other boot - one finger worn off, another getting close. 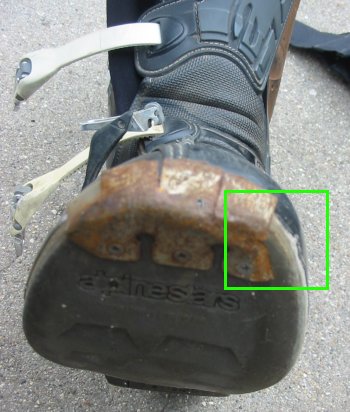 First Gear HT Overpants (PDF) My prior pants were
Joe Rocket Ballistic (v2.0's ?? - PDF for the current v5 pants). Each had pro's
over the other. One web post seems to think the HT's fabric will not
hold up in a slide as well as the JR pants. Both pants have the same
zipper along the back (to zip to the jacket) - nice having the same
zipper. The foam armor in the JR pants semed to move about a bit more
than these. The JR pants had one, nice, pocket on the right thigh.
These pants have three almost useless pockets (two front, one rear).
The flaps on these
pockets use a Velcro arrangement that also has a piece of material that
is folded back along the seam - I think to help keep water out. The
Velcro, being new, is difficult to open and needs an un-gloved hand to
operate. Once open they are a bit hard to reach into - the rear pocket
requiring contortionist moves. The two front pockets, where I
used
to carry the main Swiss Army knife and my wallet now only carry only
the knife. The wallet had to move to the jacket as these pockets are
too close to the leg/torso joint. I prefer the wallet in the pants as
through the day the pants are always on (with me so the wallet is with
me) whereas the jacket will be taken off and hung somewhere - now I
have to remember to fetch the wallet - carry it in my hand - while at a
quick stop restaurant. Sitting on the bike puts the wallet right across
the joint and since it doesn't bend it 'crunches' up against me -
uncomfortable. Closing the pockets - with the odd flap - requires
almost two hands to align and seal the pocket. One other complaint is
with carrying change in the front pockets. For some reason change will
work its way to the lower portion of the sealing seam / joint. Thus,
when opening, you have to be careful to catch any change that starts to
spill out. It would be nice to have two thigh pockets like the ones on
the JR pants. The closure on that pocket was a simple flap held in
place with Velcro with zipper across the pocket under the
flap. A
two part open/close process but each is simple enough for a gloved hand
(and you could leave the zipper unzipped if you wanted).
With the liner installed on these HT's I did stay dry for the rain I had. Recall I ride a naked bike - no fairings or windshield to help keep rain away. I recall two long rain days of riding at the end of this trip - so far I'm pleased in the rain arena. 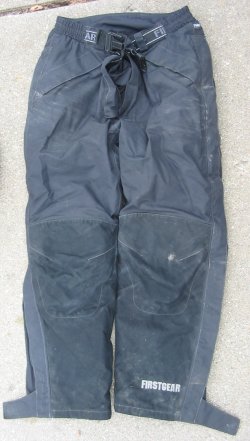 Rain Suit Frogg Toggs Pro Angler rain suit (PDF) Good stuff. Packs
small. Lightweight. Windproof. Rainproof. The jacket is showing some
wear. The hook side of the Velcro on the
gloves will catch the material of the rain jacket and pull at it. The
sleeve areas are getting thin. They still do keep rain (and wind) out
though.
 Burn mark on the
collar. When I
arrived at the campsite in Florida -
about 10 or 10:30 pm I left the headlight of the bike on for some
light. Not wanting to be too bright for the other campers I set the
rain jacket over the light to dampen it (I often put the jacket over
the instrument cluster when I remove it). Several minutes later I
smelled an odd smell - the material started to melt from the headlight.
I probably should
cover the burn hole with some glue or tape. Rolled inside the zippered
collar is a hood - sometimes used for a bit more warmth around the neck.
 Heated Jacket Ahhh - the heated jacket - Warm-n-Safe Jacket Liner (PDF) Those that have
electrically heated clothing always say - "Once you try
it you'll never go back". Not having any before this trip I always
thought - "I'll
just put on a few extra layers" (and when I purchased the riding jacket
I ordered a larger size so I could add layers).
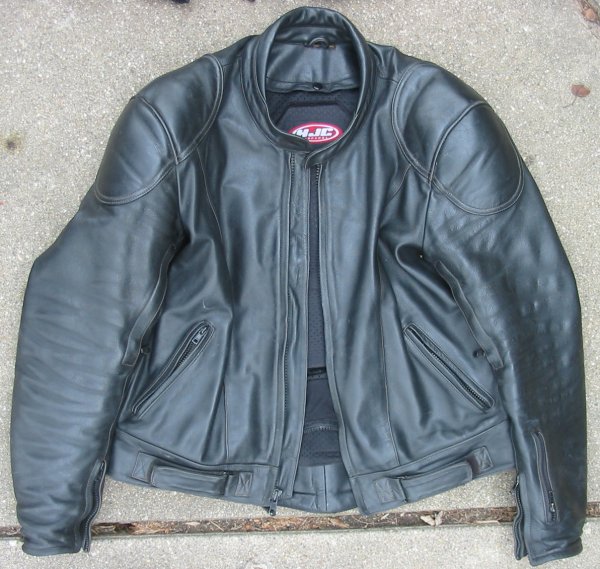
Now, having heated clothing I fully understand - and will not (at least readily) go back. The kick is that with layers the body is still loosing heat. With heated clothing the ability exists to put heat into the body. I've had a couple past rides where I got caught out either on a day that cooled off or a day that ended in rain (without a rain suit). Those days my body temp dropped and I was very cold. Both times I came home and filled the tub with warm water and sat in it for 30 to 60 minutes - adding hot water every so often. Not good. The electric clothing is much like an electric blanket that many people have experience with. There are small wires that run through the jacket - collar, sleeves, front, rear - that heat up and keep the body warm. There are more wires (more warmth) on the front sides than the back. This jacket has elastic on the rear of the sleeves and the sides of the torso so that the material is snugged close to the body - to get efficient heat transfer. Most bikes don't have ample excess wattage from the charging system so efficient use of the energy available is a consideration. There are four wires hanging out of the bottom. One from each sleeve to connect to the heated gloves and two others that connect to the bike (one for the gloves and one for the jacket). Havng the gloves and jacket separate is handy as I would often run them at different settings - sometimes the gloves higher than the jacket sometimes the other way around. When not on the bike all wires can be placed back into their zippered pockets making the jacket look like most any other windbreaker. On the cool days I'd wear this around (walking around town, etc) instead of the riding jacket. The heated clothing is from WarmnSafe.com - the makers of the original "Heat-Troller" temperature controller. 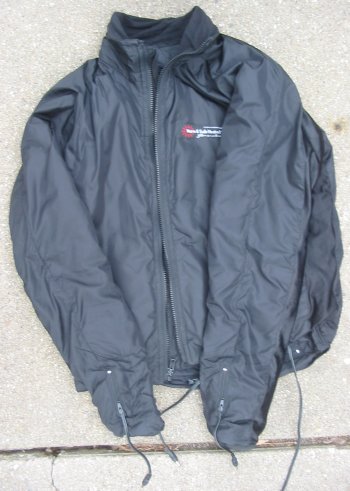 Riding Jacket HJC Neutron (PDF: general). Zipper to
connect to riding pants (holds things together should you slide), two
front pockets, one left sleeve pocket, one left internal pocket, one
external pocket across the back near the bottom - I often forget about
this pocket and don't use it much - good for a spare set of gloves
though. Foam
padding for the back, shoulders, arms. Removable vest - removed - never
re-installed. Two front vents (inside the sleeves - operable while
riding), two rear vents (on the back - remove jacket to
operate or ask someone to zip/unzip them).
 Cool / cold / rain weather gear
Neck gaiter. Pulled up to just under the nose and tucked between the body and helmet as well as tucked between the heated jacket and the riding jacket. Doubles as a hat when I'm outside, it's cold, and I don't have the helmet on. Rain mits. Purchased up in Beaverlodge, Alberta, Canada. One of the "good purchases". About $20 or $30 bucks if I recall. Fantastic. A bit difficult to put on - at least the second one - but they work - keep the rain off and add a wind break for warmth. Electric gloves on the right. Remember, I didn't start the trip with electric gloves - they only joined in at San Diego, California (two sets of these loaned to me from the folks at warm-n-safe. They are pre-production units so any review would be of little use - production units may well be different). I started the trip with leather summer gloves and winter outdoor gloves (listed as waterproof but they certainly weren't).The coldest day of the trip was coming out of Alaska into Canada (09-30 entry). Ice was forming on my helmet and the lakes had night ice on them and the trees were frosted in white. I was wearing the winter gloves with the rain mits over them. With the jacket turned up my fingers stayed fairly good - some coldness at the tips. Electric gloves certainly are nicer.  Helmet HJC CL-12?
helmet. Clear face shield (I'm not set to carry a spare shield
- dark for the daytime and clear for the nighttime). Note the camera
head mount on top of the helmet. Also note the black (electrical tape)
strips on the face shield. Explained farther down...
  The electrical tape
was a good addition. I don't need to see out of the
expansive top portion of the shield so adding two strips of tape there
kept the sun out of my eyes until later in the day. The strip across
the bottom acted like the sun visor in a car. To use it I would lift
the shield up until that lower band was blocking the sun.
Since, when it is sunny, I also have sunglasses on I still had eye
protection. That lower band was quite handy.
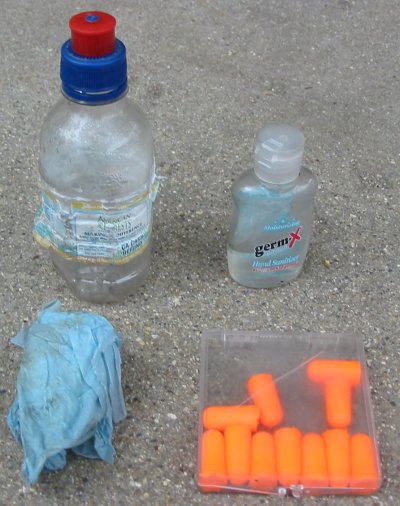
One modification to this would be to trim the lower band to about zero from the far left and right corners about 1.5 to 2 inches from the corner - taper it. The reason is that when turning my head to do a lane check that band would block some peripheral vision - forcing me to turn my neck a bit farther to see if traffic existed. The side bands could probably stay or go - I'm not sure they did much.  Saddle bag - right side - front pocket Water bottle (in
conjunction with the towel in
the map pouch I could clean the face shield and cameras), hand cleaner
(helpful after visiting the campground washroom), paper towel (check
oil on the right side of the bike), extra earplugs.
 Saddle bag - right side - outside pocket 1) Winter gloves
[used at the beginning of the trip but not used since
the electric gloves]; 2) One set of electric gloves [I had two sets -
they were pre-production units and were slightly different between
them]; 3
& 4) Leatherman
Crunch (PDF) and
REI Safety kit (PDF)
[some band-aides were
used here and there - small stuff]. Hopefully this kit would be
complete for most roadside aide [it includes a "how-to" book - most
important for at least me].
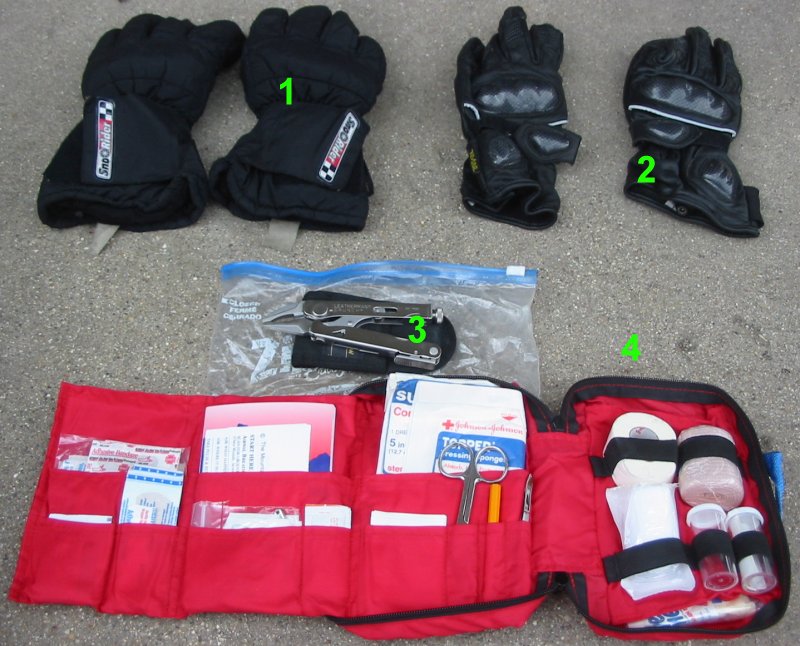 The first aid kit packed up with the leatherman inside - kept in the plastic bag to keep it dry. 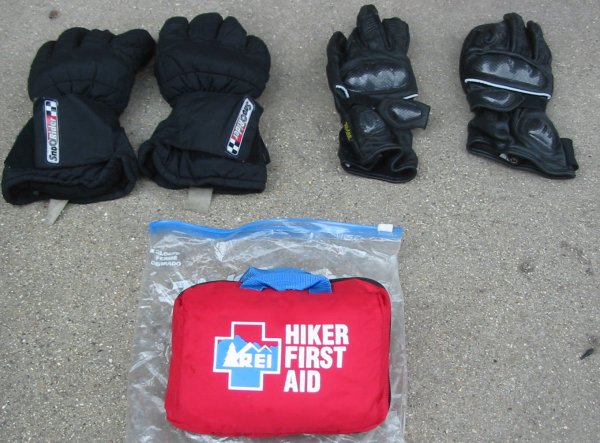 Saddle bag - right side - main pocket Books, "nice" clothes, oil, slime. Not shown is the camcorder that would sit on top of this stuff - again in a plastic bag to keep it dry. 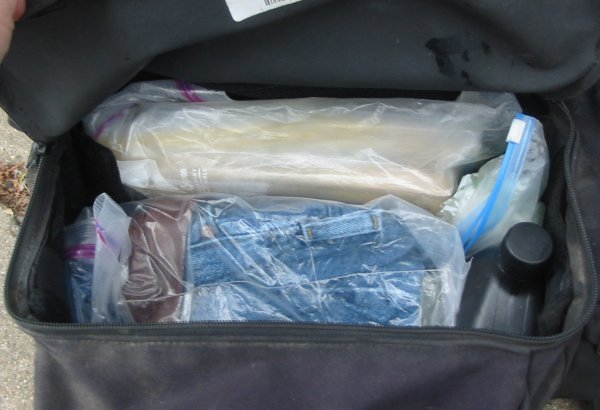 1) Oil. The bike uses
it at higher road speeds (higher throttle
opening). Perhaps a quart to 2000 miles at higher speeds. Perhaps a
quart to 4000 miles to 55 mph speeds. 2) Extra bottle of slime -
insurance purchase after the flat tire in PA. The prior bottle of slime
was smaller and fit in the "supplies" bag kept in the left saddle bag;
3) camp towel for drying off after showering [I coud see getting rid of
this yellow thing and using only a smaller standard bath towel]; 4)
Books - Clymer shop manual (with wiring diagrams) & a paper map
(just in case the electronic stuff konked out). I used the shop manual
a few times (starter relay wiring diagram) but only used the map book
once - and just for something to thumb through. 5) "Nice clothes"
[jeans, shorts, button down short sleeve shirt, belt] - useful
when going out to dinner somewhere and I'm not on the bike, off-bike
footwear are sandals (below); 6) summer gloves [leather with padded
palm, gauntlet style].
The only things I'd change here- smaller bottle of Slime, different towel. 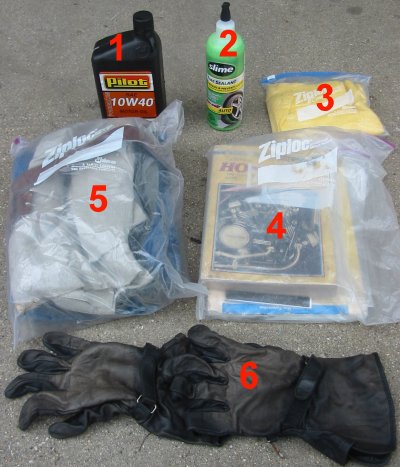 Saddle bag - left side - front pocket Plastic bag for granola bars. Padlock for hostel lockers (heavy weight - try to keep it on the left side) 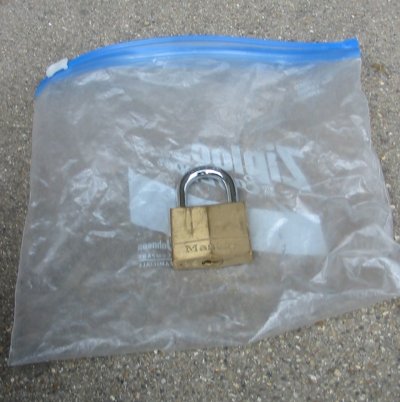 Saddle bags - left side - outer
pocket
Sandals - versatile and they pack small. Decent enough for nicer
outings as well as being handy for some of the questionable bathrooms
and showers. Sunblock - I didn't use it as much as I should have (but
it did come in handy a few times). I should probably have put it in a
smaller bottle and put it up front in the pouch with the granola bars -
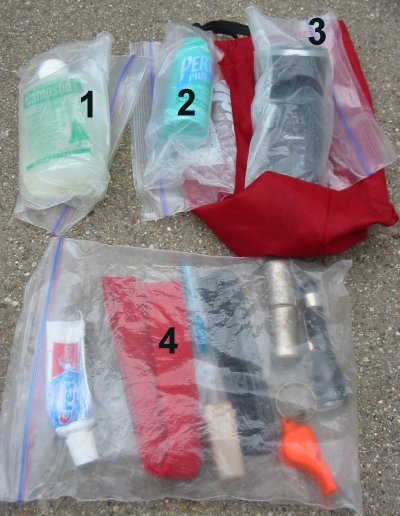
little is used as only my upper cheeks and nose are exposed.Bag with bags and stuff. Spare plastic bags [also some Camelback sterilizing tablets]. A few more than I needed but they don't weight much and they compressed down. Also in there is laundry detergent (powder or tablets). Two mesh ditty bags - not used - should have shipped them home (I had thoughts of putting drying clothing in there and hanging them from the bike for things to air-dry that way - didn't work well - didn't use them). In the end, for laundry, I ended up finding standard washers and dryers. Sink cleaning with air drying didn't work well. 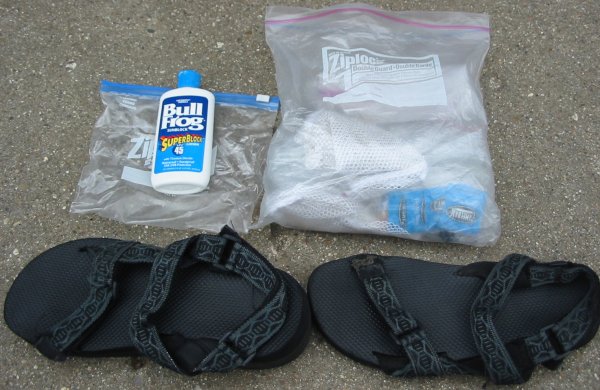 Saddle bag - left side - main pocket Red bag for toiletries, t-shirts, underwear / socks 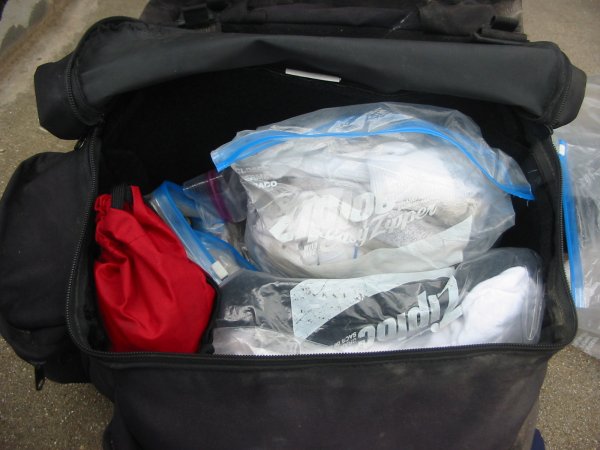 1) Toiletries bag; 2) Breakdown supplies; 3 - 5) t-shirts, underwear/socks 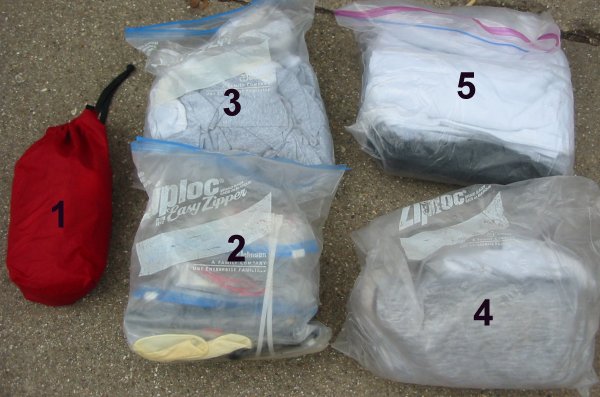 1) Campsuds
(bio-degradeable liquid soap); 2) shampoo [these two items
were bagged more for them leaking out than them getting wet from rain -
they never leaked out though]; 3) electric shaver [recharging cord in
the hard case with cords]; 4) toothpaste, red headband for the mag
light [used once or twice], teethbrush, comb, whistle, matches, AAA
battery flashlight. The whistle should probably be in a handy coat
pocket..... [matches and flashlight not used - but who knows - perhaps
I should relocate them to the first aid kit]
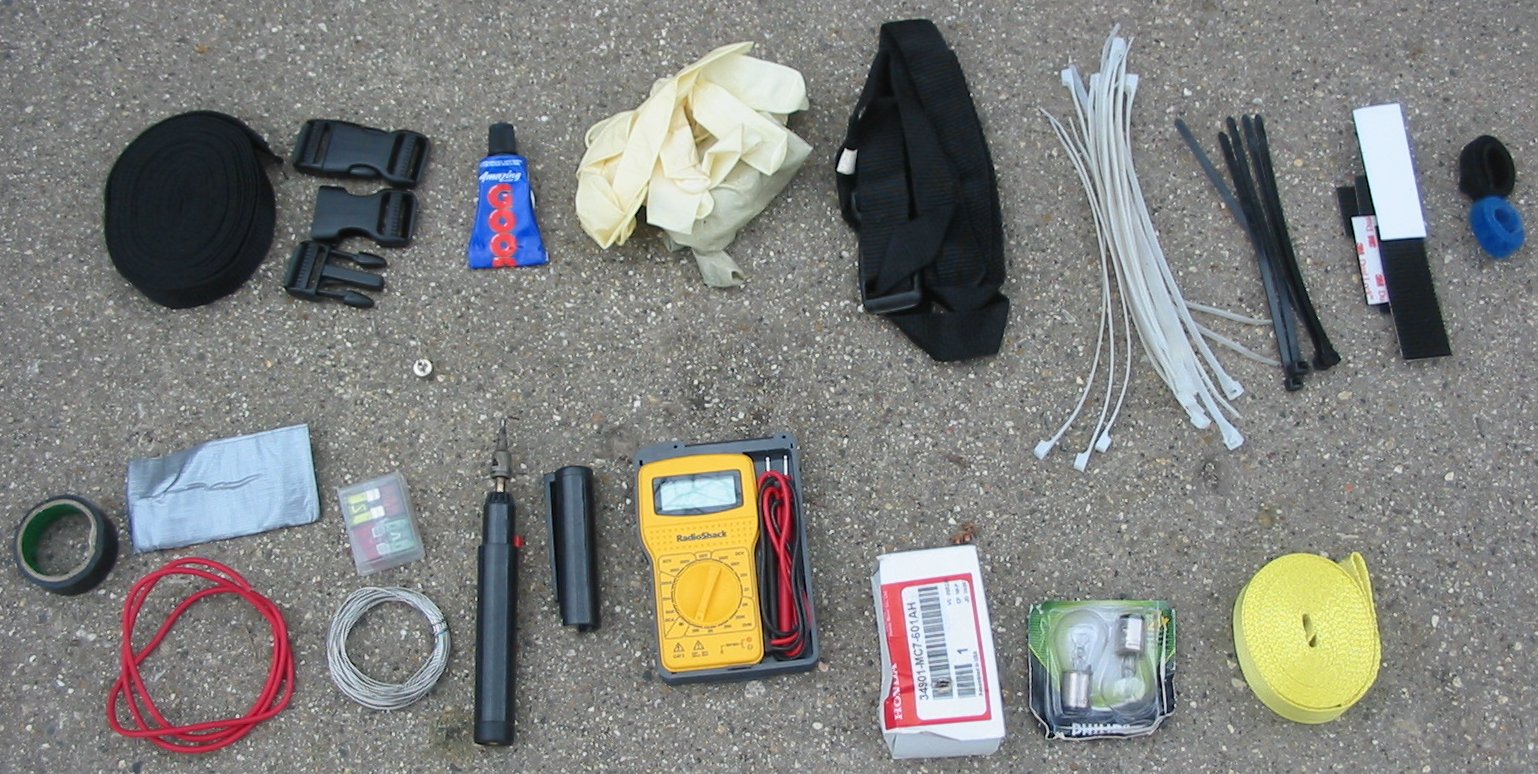
 The main breakdown supplies bag Let's do a clockwise
loop starting at the top left black thing: Extra
strapping band plus two buckles; Green box has a valve core removal
tool (from the Slime bottle); small bottle of glue (Goop); latex gloves
(I should have put a couple on at the final drive changeover); a black
pre-made strap (was for the hard case); longer use-once white zip ties;
shorter re-usable black zip ties; 3M SuperLock unisex fasteners (used
for the
power converter box and various other small items about the bike - fire
truck, volume control, camera head); two double sided hook-and-loop
cable
managers (used for wrapping up excess cable but could be used for other
purposes); Yellow tow / lashing strap (the black and yellow spools
combined could be a tow strap); tail / brake light bulbs; headlight
bulb in the box; small portable multi-meter; butane soldering iron
(with a few inches of solder wrapped around the tip); aircraft fastener
safety wire; spare fuses; some remaining spare wire, a pack of duct
tape; a roll of electrical tape.
So let's see - what was used. Valve stem removal tool [flat tire in PA], Goop [re-glue the jacket thermostat control box to the handlebars, try to make the boots more water resistant]; latex gloves [used some - should have used more]; multimeter [issues with the electric gloves]; soldering iron & solder [the first Heat-Troller blew (probably due to my shorting it out when I installed it) so, with a spare 12V DC switch I had I took several feet of wire and made a full-on/full-off switch for the electric jacket & gloves - soldering the connections - this on/off mode was made at Hesperia CA (11-15 trip entry) and used from there to Denver CO. The electric clothing wasn't needed much in CA or AZ (some near Flagstaff though) or NM but was needed in CO. Having a full-on/off setup - and one where the gloves and jacket were on the same control made me appreciate the dual-zone, variable heat controller ever more]; Red wire [used for the above wiring project], duct tape [used to help another motorist fasten a mirror to a pickup up at the Yukon River crossing]; electrical tape [wiring insulation, helmet shield sun blocking]. Next time I'd probably bring fewer zip-ties, fewer SuperLock pads, only one wire manager, and the rest would probably stay the same - maybe a little more solder. Maybe leave the yellow lashing strap at home since I do have the black tie-down strapping. On the strapping - great stuff. Buy the strap in bulk (1" width I think), cut to desired length - add buckles. No buckle failed - sweet. Some strapping did fray a bit due to the steel it wrapped around - but none so bad for me to consider replacement. The soldering iron is useful to melt down the ends after the strapping is cut - to keep it from fraying back (or you can wrap tape near the ends to keep it from fraying - note white tape on the pre-made strap in the picture). (click for a larger size) 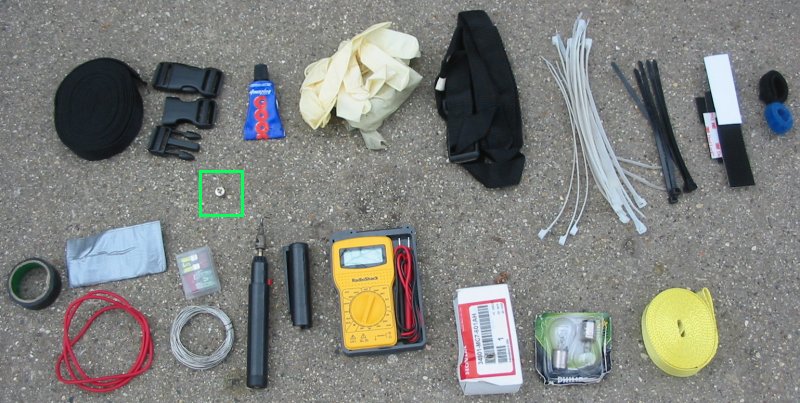 Saddle bags - left side - wear marks 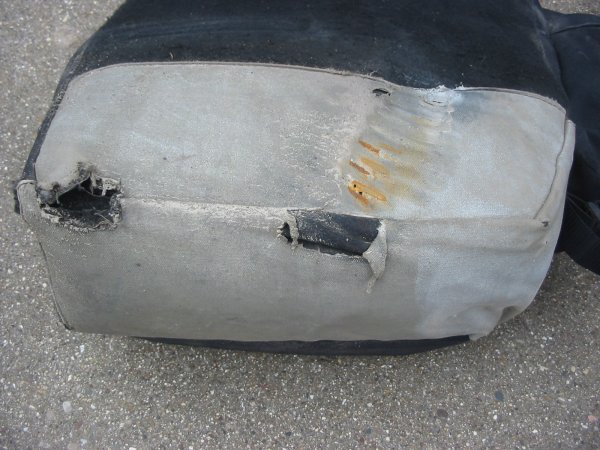 Saddle bag - right side - wear marks You can certainly see
the shock
spring marks. The heavy ripped area is
due to the break calipur. The mark in the bottom right (outer section
of the bag) is from the muffler tip. I was a bit concerned with this
right side bag making it through the trip - but with occasional checks
- it was hanging in there (the brake calipur had eaten into the bag on
prior trips and so it was somewhat like this when I started this trip).
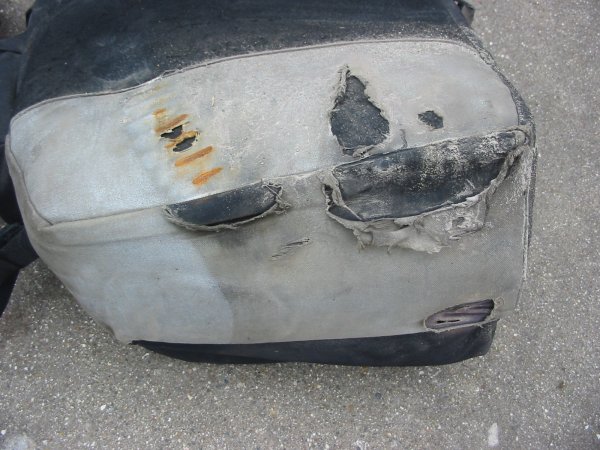
Good bags. No zipper failures (and they do
take some decent pressure when zipped and loaded in addition
to zip/unzip abuse on the main pocket zipper. No straps pulled
out
- again amazing with the miles of bumps they endured with the weight
they carried. I did skip the external "rain/waterproof bags" that come
with them - the decision to instead use zip-lock bags inside
(rain
proofing as well as compartmentalizing).
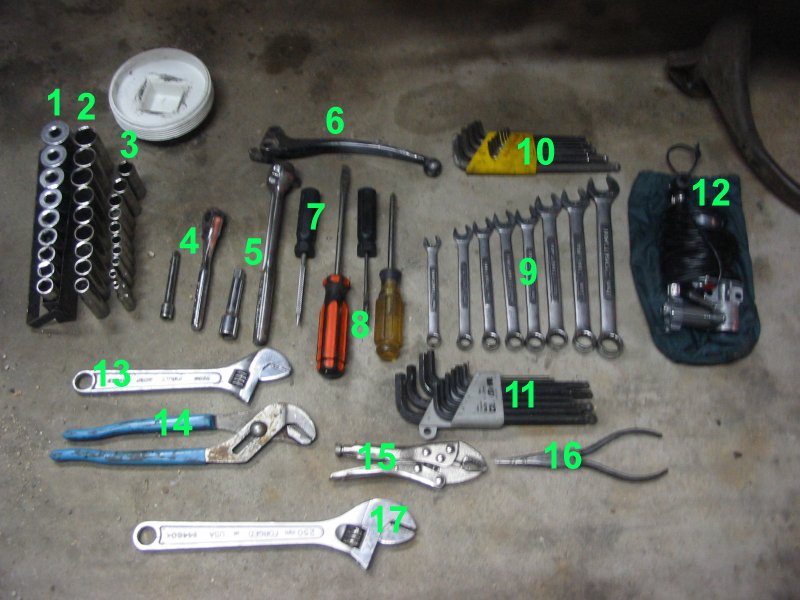
 Tool tube Way more than I
needed - I'm glad to say - though #12 (air compressor)
let me down. I'd probably pack it just the same for a different trip.
1) SAE sockets, 2 & 3) Metric sockets - yes I did use the
smaller
set - hose clamps that did not want to cooperate with screwdrivers; 4
& 5) ratchet wrenches with short extensions; 6) spare clutch
lever
7) black handles - tire plug kit tools - used in PA for the flat tire
8) slotted and Philips screwdrivers (I could have used a small
'electronics' screwdriver set - for the cameras); 9) Metric open/box
wrenches, 10 & 11) Allen wrenches - SAE and Metric; 12) Air
compressor - stripped down unit - it worked in the past to fill tires
(flat
tire trip from DeKalb) but not on this trip - need to
re-think;
13-16) Assorted wrenches; 17) Adam's larger wrench for the rear axle
nut (though I think the bike's kit has a wrench for this item - need to
check).
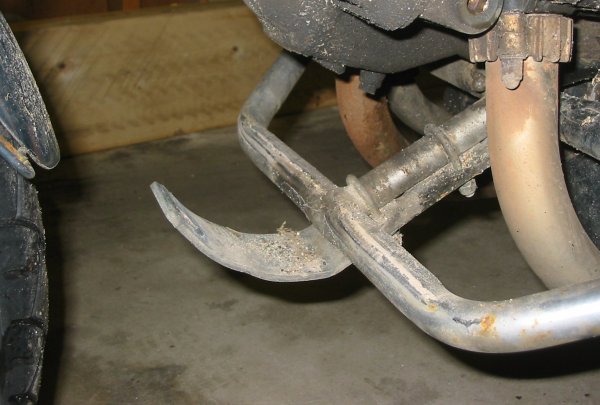
 The tool tube 16.5" long 4" diameter SCH 40
plastic piping. Dome cap on one end. Screw cap the other. Both ends
affixed with standard plastic cement. 19.5" max internal length. Screw
cap placed on kickstand side of the bike - any water that could work
its way into the tube could then drain out (not an issue). Placing
tools into the tube almost required the bike to be on the centerstand
as they would want to "fall out" if the bike was on the kickstand. Four
garden variety stainless steel hose clamps.
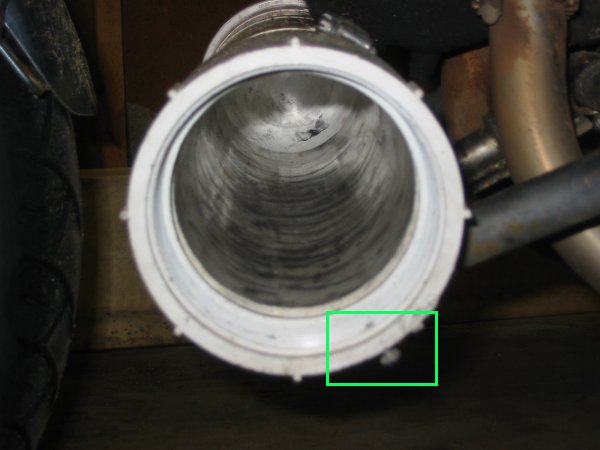
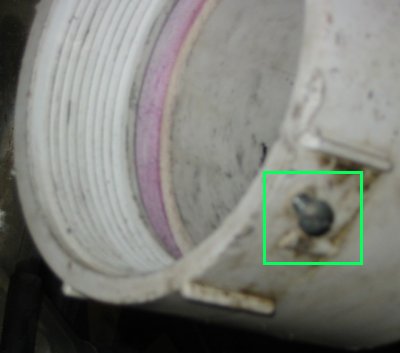
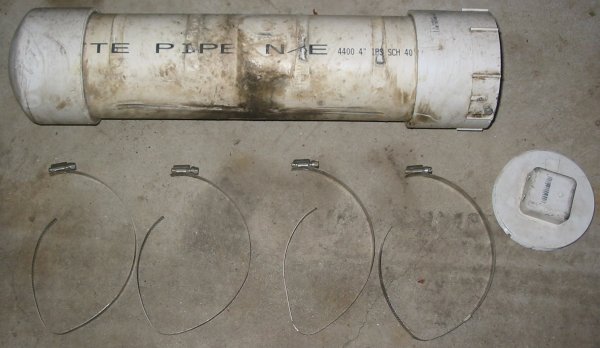 Note locking screw in the green box - slotted head style (easy removal
with a screwdriver or a thin coin / Dime). Locking screw placed low and
out of the way to keep any person from readily walking up and
unscrewing the main tube cover (also keeps the cover from vibrating off
as I head down the road).
  Unsure of the ability of the four
straps to hold the tube in place I added a steel hand to help out. A
bit of steel bashed into a desired shape and u-bolted to the engine
guard. Those exhaust pipes did have a reasonable chrome finish on them
when I started the trip. I wonder if they will clean up?
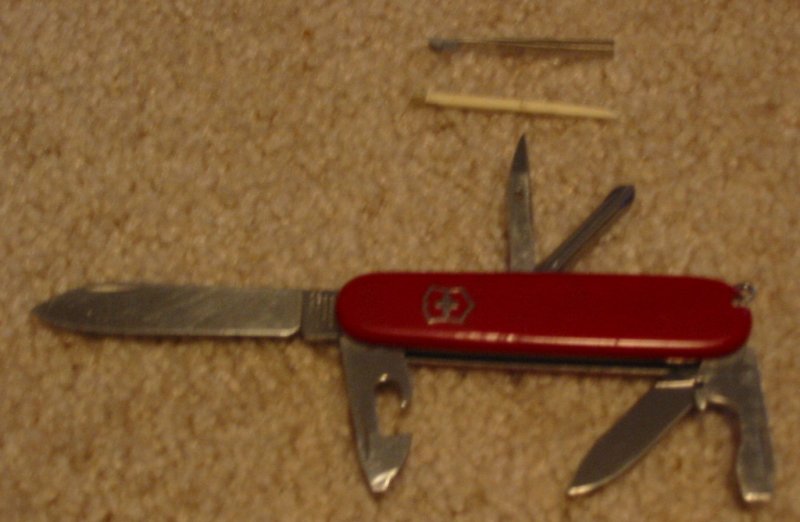
 Primary Swiss-Army knife Right pants pocket.
Straight blade to remove the tool tube locking
screw. I think I used all items on this tool - perhaps not the can or
bottle openers though. This is mainly a daily use tool - I often feel
out of place if it is not around.
 Riding jacket contents 1) Front left pocket -
Cell phone in a protective aluminum case, lip balm.
2) Front right pocket - wallet, coins, Swiss-Army USB knife with flash memory (Thanks Bob!), Garmin antenna (not used). This small Swiss-Army knife was used frequently as well - the scissors (cutting the tent ground plastic, cutting elect tape down the middle, maintain finger/toe nails) & pen - for when a pencil just doesn't do. The flash memory was used for some backups of data from the notebook. 3) Left sleeve key pocket - Key, earplugs, gift coin (kept out of the main coin jumble), lighter to free a frozen lock (probably won't keep - at least not there) 4) Inside pocket - 2-AA Battery MagLight (main flashlight), holding spot for the XM Roady2 radio (inside of a plastic bag), Etymotic ER6i earphones in their pouch. Something is missing - asprin bottle. It was small - similar in size to the lip balm. It was carried in one of the front pockets. 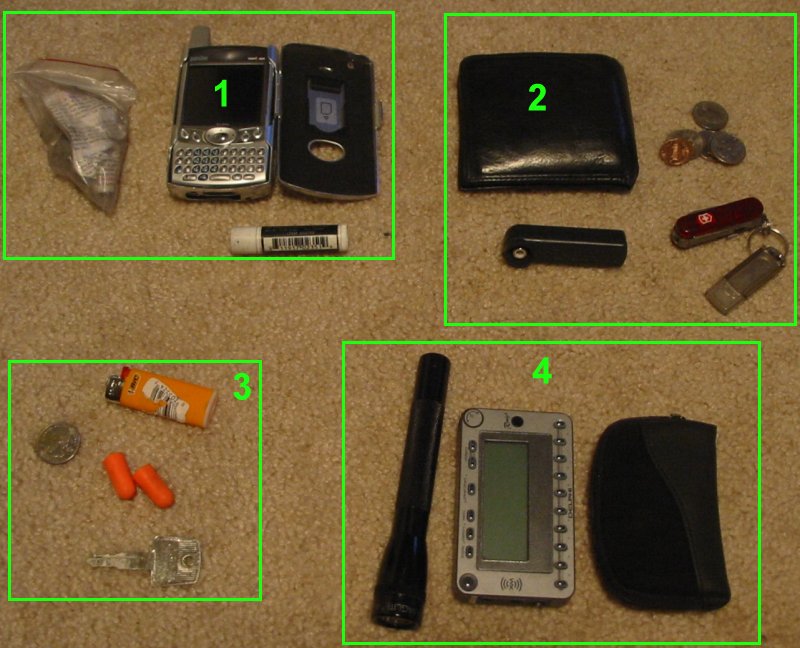 PalmOne Treo 600 PDA/Cell phone with RhinoSkin aluminum case. 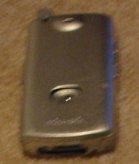 Inside the hard case - Laptop and accessories 1) Cables & hostel handbook 2) Tapes, batteries 3) Cords and chargers 4) Laptop 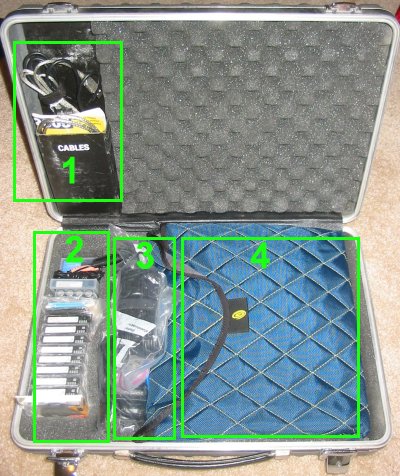 1) The Hostel
Handbook (www.hostelhandbook.com)
- quite handy, only $4 bucks. I made a comment to the editor for them
to include a map of each state showing where the hostels were. This was
an issue for me. A state with hostels in several cities - cities where
I did not know the location - is it on my route or not. I would have to
pull out the
laptop and go to a map program to do a "find" for each of the cities.
The are re-thinking the map inclusion. I hope
they do include one. If I had time, and an Internet connection I would
hit some of the hostel reviews - to see if the hostel was a good one or
not (hostel handbook is a simple contact list - no reviews). Hmm -
hostels - great things. Perhaps some comments in the post trip thoughts
page.
2) Laptop to GPS cable - longer and more gangly than I cared for. Perhaps I need to shorten. 3) Camcorder to laptop cable - nice and short with no bulky ends. 4) USB powered light (Thanks George!) - useful for laptop work in a dark area/tent - oddly a bright laptop screen just doesn't illuminate the keyboard as one would like. ???) The item MISSING from this (place this note here since the HHandbook is here) would be a CAMPGROUND handbook. Finding campgrounds was difficult. I'd do some web searches. Near the end of the trip, while searching for the Florida campsite, I found a website offering a consolidated campsite listing - OOOOHHHH - Next extended camping trip - a must have item. 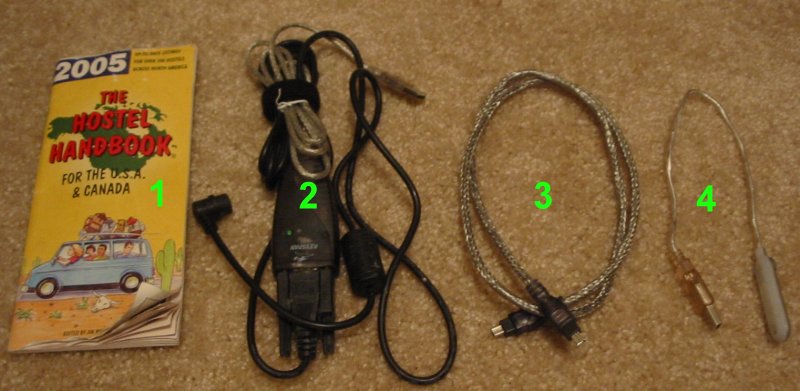 Laptop & protective sleeve
Dell 700m Pentium M 1.8GHz, Centrino, 80GB HD, 1GB RAM, Dual layer -/+DVD writer, 1394 (camcorder connection), 10/100 wired net, modem, B/G wireless net, 8 cell battery (5.5 hours run time, under basic typing/photo editing use), 12.1" wide screen. The laptop did not suffer any bad scratching on the screen or case. There was some nominal scratching on the silver portions of the "inside" face - below the screen and the mating section between the "Dell" wording and the power button. I put some clear tape over these areas - no more marks to the case. There was some concern that the keys would rub against the screen - no marks so far. As for the laptop having issues with bumping down the road - it doesn't seem harmed (optical and hard drives work as desired). Timbuk 2 laptop sleeve - purchased at REI in Seattle, WA (PDF). A step up from the large zip-lock bag used from the beginning of the trip. This sleeve could be a bit smaller but the extra "move around" space doesn't seem to be detrimental. 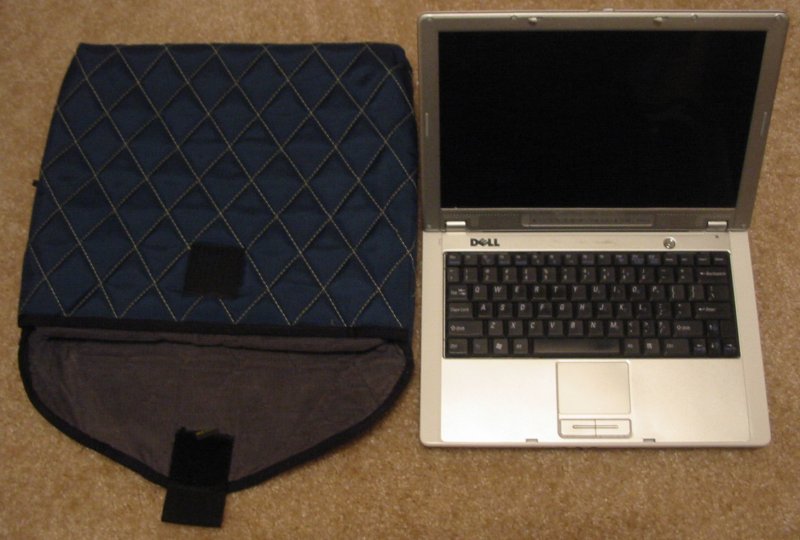 Cables 1) Laptop charger; 2)
Camcorder charger; 3) Cell phone charger, cell
phone to laptop (Palm device) sync cable, face shaver charger cable.
 1) Passport; 2)
Batteries [all in the same orientation = fresh, in
an every-other orientation = used]; 3) Mini-DV cleaning tapes (why two?
the first one I think goofed but I don't want to toss it just yet); 4)
camera lens cleaning kit; 5) Protective covers for the camera head; 6)
Mini-DV tapes [full and empty]; 7) spare UV filter for the still camera
(saved in case the in-use filter gets broken by a rock); 8) Microphone
for the laptop - to use the VOIP software
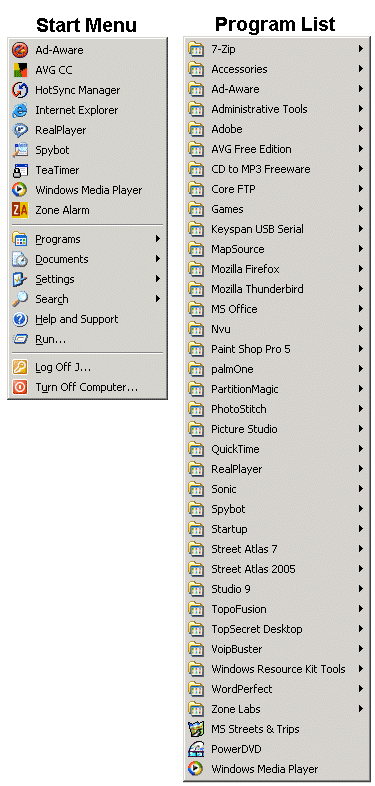
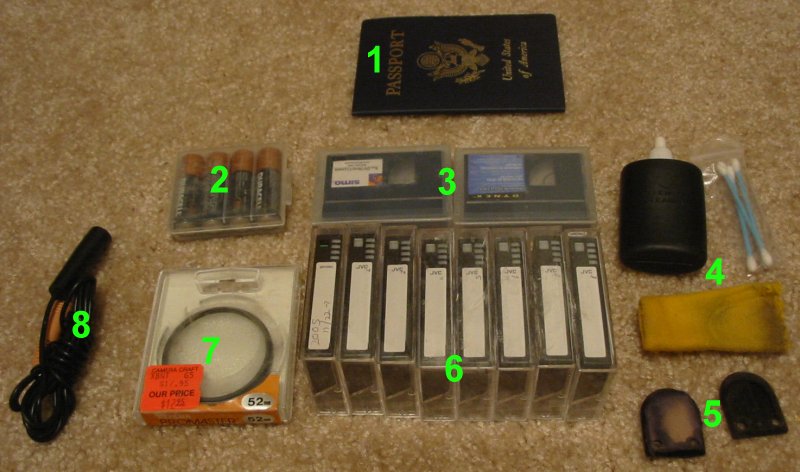 Contact card with my cell phone number - just in case 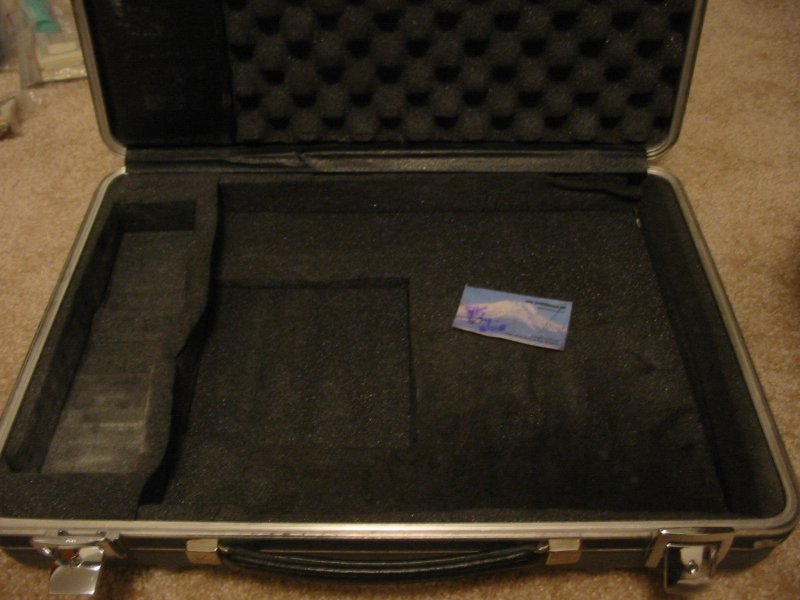 WhooHoo - the first - and still only - stamp in the passport 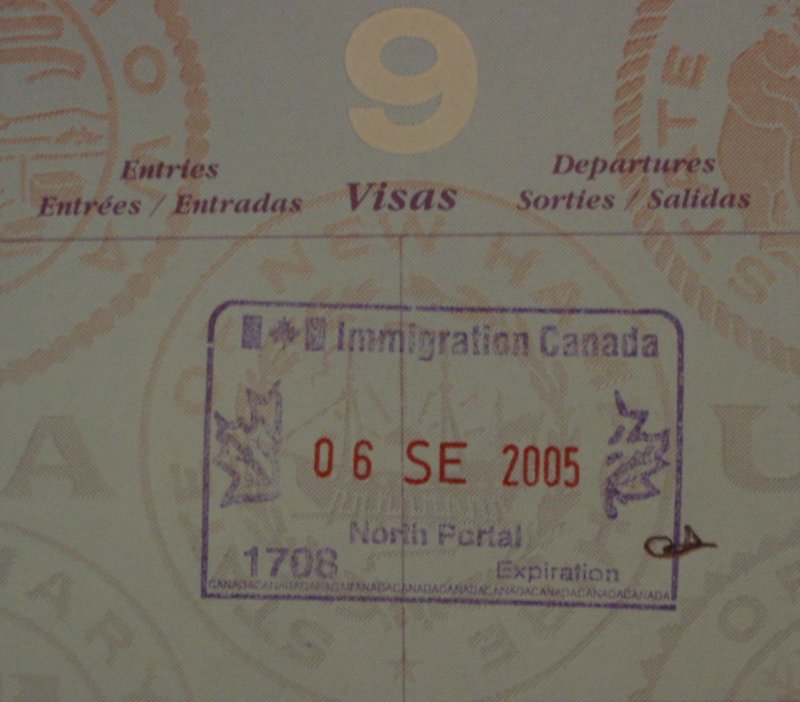 Software Desktop image (reduced to fit this screen)  Quick launch items Top row - left to right: Command prompt,
Windows Explorer (file operations), Palm Desktop (addresses), TopSecret
(passwords), Nvu (web page editor), MapSource (GPS map software),
WordPerfect (word processor - used, with macros, for the start of each
web page), Word (word processor), Excel (spreadsheet), AOL Instant
Messenger, VOIP Buster (Internet telephone via the laptop), Notepad
(quick notes), Calculator.
Bottom row - left to right:
Modem dial-up connection, Wireless network connection, Core FTP LE
(transfer files to the website), WayPoint+ (GPS transfer utility),
Street Atlas v7 (older map program - used for track maps on the
website), Street Atlas USA 2005 (primary mapping program), Microsoft
Streets & Trips 2005 (secondary mapping program), Photo Stitch
(used to stitch photos together for the panorama pictures), Paint Shop
Pro v5 (photo editing program), Studio v9 (movie edting), Mozilla
Thunderbird (e-mail), Mozilla FireFox (web browser).The quick launch items are mostly "daily use" items. The "Start Menu" contains lesser used items. The main program list depicts the standard list of software. If you wish to see the start menu and main program list: click for image System tray (items in the top right of the desktop) Top row - left to right:
Wireless network status - Microsoft client (not used much), TeaTimer
(SpyBot utility), Sound level / mute status, "Remove Hardware" utility
(not used).
Bottom row - left to right: Battery status (important), ZoneAlarm (software firewall), AVG (antivirus), Wireless network status - Intel client (used often) Software
OK - this next table will run though most (all?) of the software is used while on the trip. Feature / Pros / Cons. Like most of the items on this crazy gear review page - it might be more detailed than it needs to be. You clicked the link - you didn't have to (but then if you're reading this - you must be crazy (or find it of possible good use) - and have a lot of time on your hands)!
One for the end of the page Hard bags vs Soft bags I currently soft bags - initially
less expensive - perhaps overall less expensive. Side saddle bags
"give" and "spring back" when the bike tips over. Hard bags - in a
lower impact situation provide some safety to the rider (side impact
and tipover). In a higher impact situation they tend to deform - and
they don't "spring back". This not springing back is an issue -
hammering / beating the thing back to some straighter form can be a
task. The lid's water seal is now compromised - how hard is it to get a
waterproof seal again? Some hard bags are affixed to the bike - they
generally stay with the bike - while others are readily detachable.
Soft bags are not lockable though
most hard bags are - even the detachable ones. I've seen two types of
hard bags in use - those with liners and those without. With the soft
bags the whole bag goes into the tent/hotel/hostel/place of sleep. This
is fine for dry days but on wet days the bags are wet and often covered
- on the rear specifically - with road grit. A detachable hard bag
without liner is much like the soft bag (the whole thing is taken
inside) - except they can be wiped down and fairly easily dried before
being taken inside. Hard bags with liners are nice - the items not
needed inside the place of sleep can stay in the hard bag on the bike
as a smaller pouch is removed to be taken inside. The internal pouch is
never wet so taking it inside is a clean task. It would be nice
to have at least one hard bag - one that could hold the more expensive
items - locked, out of sight. No bag changes planned for this bike -
but a next bike might see me changing things a bit.
If you have any questions from this gear review - I welcome any question you might have: Contact page. |